---
title: (2nd) HowTo:架設安全、可負載高流量的網站 | zh
tags: HowTo, VCS, ZH
GA: UA-155999456-1
---
{%hackmd @docsharedstyle/default %}
{%hackmd @docsharedstyle/twccheader-zh %}
# 第二部分:為網站加裝 SSL 憑證
為避免網站在傳輸資料時被有心人士竊取,建議您參考以下步驟,為您的網站服務加裝 SSL 憑證,所有的資料都會在加密的狀態下進行安全傳輸。
[TOC]
### Step 1. 申請 Domain Name
透過申請網站 Domain Name,使用者在網址列輸入好記的 Domain Name (而非生硬的 IP 位址),就可以快速開始使用您的網頁服務!
您可以依需求選擇付費或免費網站申請 Domain Name,範例採用 [No-IP](https://www.noip.com/) 做為範例網站,申請免費 Domain Name:
1. 註冊 [No-IP](https://www.noip.com/) 帳號
2. 登入後,左側選單 「**My Services**」 > 「**DNS Records**」 > 上方選單 「**Create HostName**」
3. 設定 Hostname (Domain Name):*<span>oliversslwebsite.ddns.net</span>*
4. 設定 IP Address:輸入 *負載平衡器的 VIP*
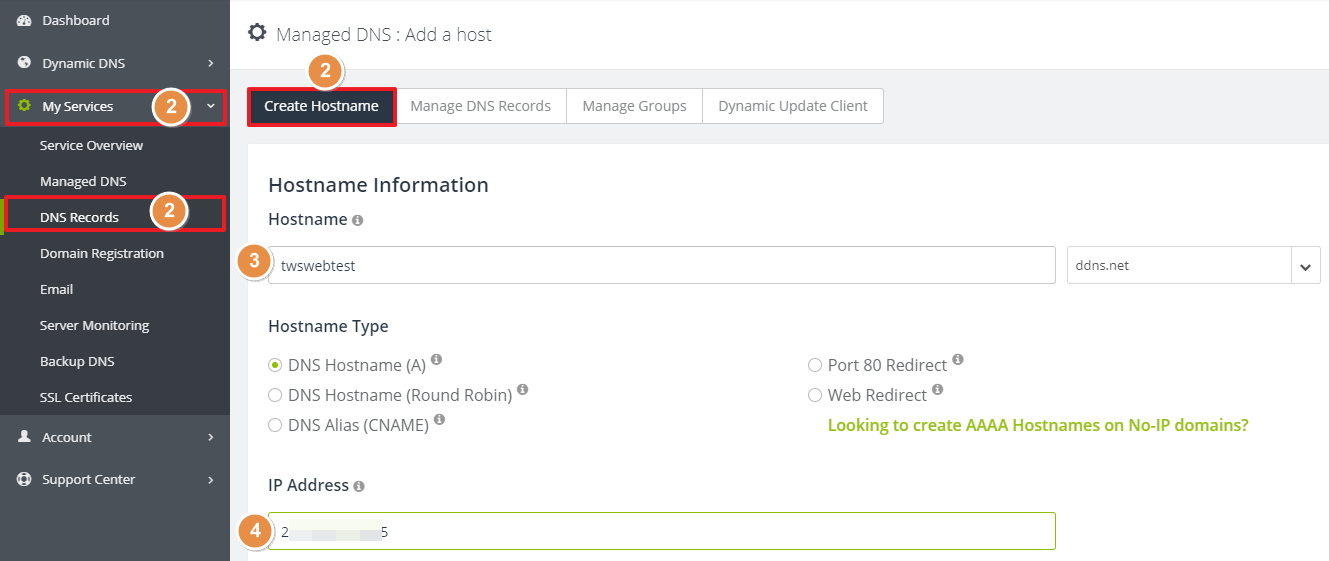
5. 點選頁面右下角「**Add Hostname**」

6. 設定完成

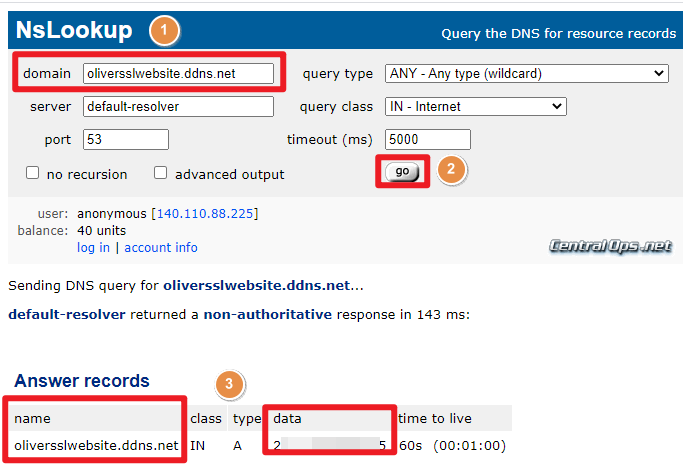
- 可使用 [NsLookup 工具](https://centralops.net/co/NsLookup.aspx)確認可查詢到該主機 (負載平衡器)
1. 輸入 *Domain Name*
2. 點選 「**go**」
3. 確認可查詢,下方將顯示查詢資訊;Domain Name、負載平衡器之 IP 位址
### Step 2. 申請 SSL 憑證
您可以依需求選擇付費或免費網站申請 SSL 憑證,以下範例透過 [Let's Encrypt](https://letsencrypt.org/) 工具,申請免費 SSL 憑證:
- 輸入以下指令在 *lbssl01* 個體中使用 Domain Name,透過 [Let's Encrypt](https://letsencrypt.org/) 申請 SSL 憑證:
```bash
$ sudo apt install certbot python3-certbot-nginx
$ sudo certbot --nginx -d <Domain_Name>
```
:::info
<i class="fa fa-paperclip fa-20" aria-hidden="true"></i> **附註:**
1. 以下輸入 e-mail 接收緊急或安全性通知
```
Enter email address (used for urgent renewal and security notices) (Enter 'c' to
cancel):
```
```
Please read the Terms of Service at
https://letsencrypt.org/documents/LE-SA-v1.2-November-15-2017.pdf. You must
agree in order to register with the ACME server at
https://acme-v02.api.letsencrypt.org/directory
- - - - - - - - - - - - - - - - - - - - - - - - - - - - - - - - - - - - - - - -
(A)gree/(C)ancel: A
```
2. 以下內容請選 `1`,無需將 HTTP 連線導向 HTTPS 並刪除 HTTP 連線:
```
Please choose whether or not to redirect HTTP traffic to HTTPS, removing HTTP access.
- - - - - - - - - - - - - - - - - - - - - - - - - - - - - - - - - - - - - - - -
1: No redirect - Make no further changes to the webserver configuration.
2: Redirect - Make all requests redirect to secure HTTPS access. Choose this for
new sites, or if you're confident your site works on HTTPS. You can undo this
change by editing your web server's configuration.
- - - - - - - - - - - - - - - - - - - - - - - - - - - - - - - - - - - - - - - -
Select the appropriate number [1-2] then [enter] (press 'c' to cancel): 1
```
:::
### Step 3. 將憑證轉檔為 Base64 格式
目前 TWCC SSL 憑證僅支援 PKCS #12 及 Base64 編碼格式,請輸入以下指令轉碼為 Base64 格式,
詳細內容可參考「[**轉換 SSL 憑證格式**](https://man.twcc.ai/@twccdocs/doc-vcs-main-zh/https%3A%2F%2Fman.twcc.ai%2F%40twccdocs%2Fhowo-lb-convert-cert-zh)」。
```bash
$ sudo su
$ cd /etc/letsencrypt/live/<Domain_Name>/
$ openssl pkcs12 -export -out server.p12 -inkey privkey.pem -in cert.pem -certfile chain.pem
$ base64 server.p12 | tr -d \\n > twcc_ssl_base64.txt
$ cat twcc_ssl_base64.txt
```
:::info
<i class="fa fa-paperclip fa-20" aria-hidden="true"></i> **附註:**
以下內容可按 <kbd>Enter</kbd> 略過:
```
Enter Export Password:
Verifying - Enter Export Password:
```
:::
- 請「**複製**」畫面顯示的 `twcc_ssl_base64.txt` 所有內容
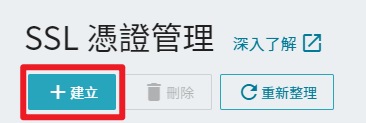
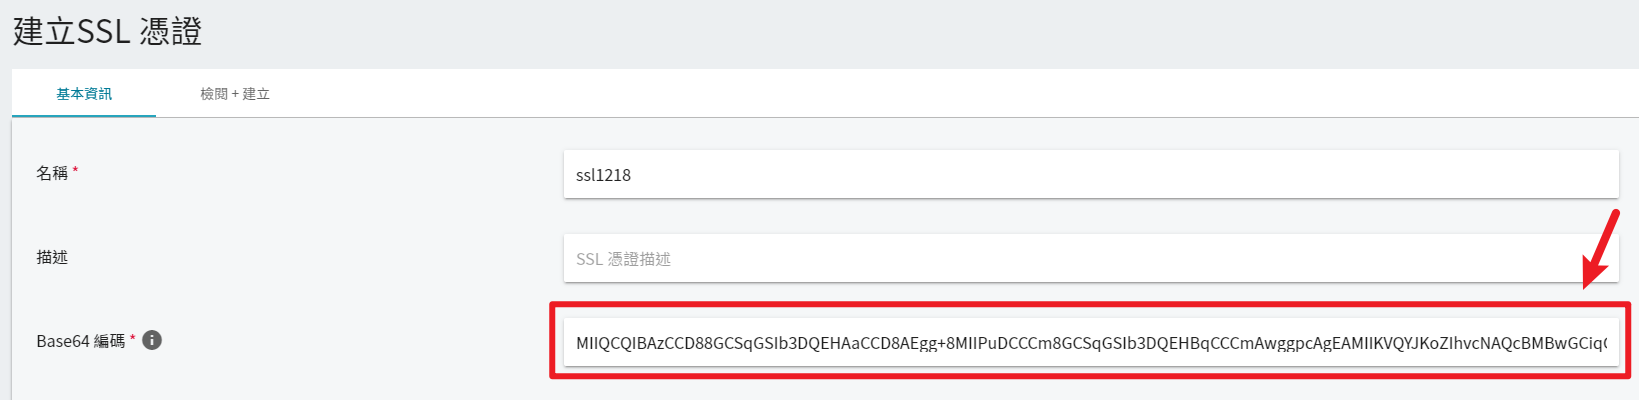
### Step 4. 將 SSL 上傳至 TWCC
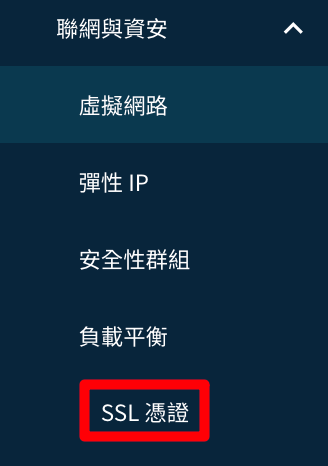
- 由服務列表點選「**SSL 憑證** 」頁面,點擊「**+建立**」
- 貼上 [Step 7](#Step-7-將憑證轉檔為-Base64-格式) 複製的 base64 檔內容
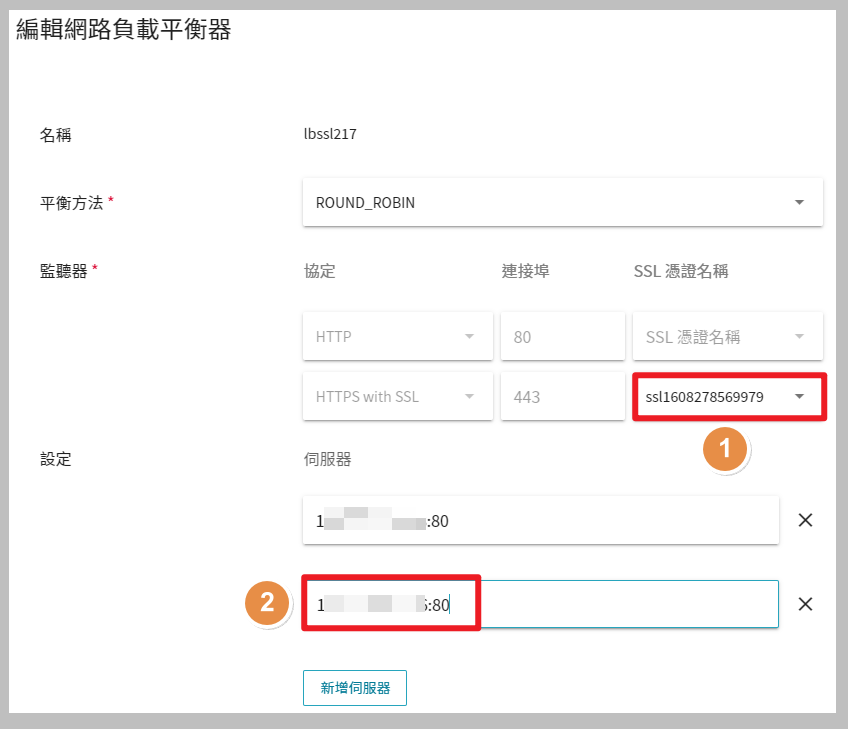
- 接著,請至負載平衡器詳細資料頁:
1. 點選「**編輯**」 > 選取剛建立的 SSL 憑證。
2. 將 `lbssl02` 個體 `<私有IP>:<連接埠>(80)` 新增至此負載平衡器。