---
title: 使用 TWCC COS 備份/同步 還原運算資料
tags: Guide, CCS, TW
GA: UA-155999456-1
---
{%hackmd @docsharedstyle/default %}
# 使用 TWCC COS 備份/同步、還原運算資料
在本文中,您將了解如何使用 COS 備份/同步 還原虛擬運算服務 (VCS) 與容器運算服務 (CCS) 之資料。針對 Linux 與 Windows 不同作業系統之虛擬運算個體/容器,將分別教學如何透過 s3cmd、duplicati 兩種第三方工具進行資料備份/同步作業:
- s3cmd,以指令列操作:適用 VCS (Linux 個體)、CCS 容器。[<ins>深入了解 s3cmd</ins>](https://s3tools.org/s3cmd)
- duplicati,以圖形化介面操作:適用 VCS (Windows 個體)。[<ins>深入了解 Duplicati</ins>](https://duplicati.readthedocs.io/en/latest/01-introduction/)
## 準備工作
- 建立虛擬運算個體或開發型容器
- 建立雲端物件儲存體,用以備份/同步您的資料
- 連結至您的虛擬運算個體或開發型容器,並取得需備份/同步的資料夾或檔案路徑
## s3cmd:適用 VCS 個體 (Linux)、CCS 容器
### 安裝與設定 s3cmd
**1. 安裝 `pip` (CCS 容器請跳至步驟2)**
```shell
$ sudo apt install python-pip
```
**2. 下載安裝 s3cmd**
```shell
$ sudo pip install s3cmd
```
**3. 設定使用參數**
```shell
$ s3cmd --configure
```
輸入完後,會出現以下設定檔的內容
```shell
Enter new values or accept defaults in brackets with Enter.
Refer to user manual for detailed description of all options.
Access key and Secret key are your identifiers for Amazon S3. Leave them empty for using the env variables.
```
**4. 輸入 COS Access Key 與 Secret Key**
請分別輸入您的 COS Access key 與 Secret key
```
Access Key: <YOUR-ACCESS-KEY>
Secret Key: <YOUR-SECRET-KEY>
```
:::info
<i class="fa fa-paperclip fa-20" aria-hidden="true"></i> **附註:**
- COS 公共空間及私有空間的Key可在TWCC 頁面,點擊「服務列表」>「雲端物件儲存」>[<ins>「連線資訊」頁面</ins>](https://man.twcc.ai/@twccdocs/doc-cos-main-zh/https%3A%2F%2Fman.twcc.ai%2F%40twccdocs%2Fguide-cos-connect-info-zh))取得。
:::
**5. Default Region:直接按 Enter 鍵**
```shell
Default Region [US]:
```
**6. Endpoint:請輸入 TWCC COS 端點:```cos.twcc.ai```**
```shell
Use "s3.amazonaws.com" for S3 Endpoint and not modify it to the target Amazon S3.
S3 Endpoint [s3.amazonaws.com]: cos.twcc.ai
```
**7. DNS-style sccess point:也請輸入```cos.twcc.ai```**
```shell
Use "%(bucket)s.s3.amazonaws.com" to the target Amazon S3. "%(bucket)s" and "%(location)s" vars can be used
if the target S3 system supports dns based buckets.
DNS-style bucket+hostname:port template for accessing a bucket [%(bucket)s.s3.amazonaws.com]: cos.twcc.ai
```
**8. (非必須) 設定加密密碼**
若需資料加密,請在 Encryption password 輸入密碼,或直接按 Enter 跳過。
```
Encryption password is used to protect your files from reading
by unauthorized persons while in transfer to S3
Encryption password:
```
**9. (非必須) Bypass GPG program path:直接按 Enter 鍵**
```shell
Path to GPG program [/usr/bin/gpg]:
```
**10. Use HTTPS protocol,輸入```Yes``` (注意字母大小寫)**
```shell
When using secure HTTPS protocol all communication with Amazon S3
servers is protected from 3rd party eavesdropping. This method is
slower than plain HTTP, and can only be proxied with Python 2.7 or newer
Use HTTPS protocol [Yes]: Yes
```
**11. Bypass HTTP Proxy server name:直接按 Enter 鍵**
```shell
On some networks all internet access must go through a HTTP proxy.
Try setting it here if you can't connect to S3 directly
HTTP Proxy server name:
```
**12. 確認設定內容**
```shell
New settings:
Access Key: XXXXXXXXXXXXXXX
Secret Key: XXXXXXXXXXXXXXXXXXXXXXXXXXXXXXXXXXX
Default Region: US
S3 Endpoint: cos.twcc.ai
DNS-style bucket+hostname:port template for accessing a bucket: cos.twcc.ai
Encryption password:
Path to GPG program: /usr/bin/gpg
Use HTTPS protocol: True
HTTP Proxy server name:
HTTP Proxy server port: 0
```
**13. Test access:輸入```n```**
```shell
Test access with supplied credentials? [Y/n] n
```
**14. 輸入`y` 儲存設定**
輸入`y`後,您將會取得設定檔的儲存路徑與檔名:`/home/<主機帳號>/.s3cfg`
```shell
Save settings? [y/N] y
Configuration saved to '/home/<主機帳號>/.s3cfg'
```
**15. 修改憑證設定避免備份/同步出現錯誤**
<主機帳號>請改為步驟 14 顯示的主機帳號
```shell
$ sed -i 's/check_ssl_certificate = True/check_ssl_certificate = False/g' /home/<主機帳號>/.s3cfg
```
### 將資料備份/同步至 COS
設定完成後,即可開始將虛擬運算個體與容器資料保存至 COS,保存的方式有兩種:備份與同步。
<span class = "number">❶</span> **備份**將保存您所有的資料,若資料誤刪或遺失,保存於於 COS 之備份資料可隨時還原。
<span class = "number">❷</span> **同步**則能讓您的虛擬運算個體/容器資料與 COS 上的資料一致,若主機資料刪除,COS 資料也會同步刪除。
- **備份資料**
- 立即備份
```
$ s3cmd sync /<LOCAL_DIR> s3://<DEST_BUCKET>
```
- 設定備份排程,例:每天凌晨 2 點定期備份檔案至 COS
輸入以下指令編輯 crontab job
```bash
$ crontab -e
```
在腳本內輸入以下指令
```bash
0 2 * * * /usr/local/bin/s3cmd -c /<LOCAL_DIR>/.s3cfg sync /home/ubuntu s3://<DEST_BUCKET>
```
- **同步資料**
- 立即同步
```bash
s3cmd sync --delete-removed /<LOCAL_DIR> s3://<DEST_BUCKET>
```
- 設定同步排程,例:每天凌晨 2 點定期將檔案同步至 COS
輸入以下指令編輯 crontab job
```bash
$ crontab -e # 新增下面內容
```
在腳本內輸入以下指令
```bash
0 2 * * * s3cmd sync --delete-removed /<LOCAL_DIR> s3://<DEST_BUCKET>
```
:::info
<i class="fa fa-paperclip fa-20" aria-hidden="true"></i> **附註:**
排程時間設定方式:<b style="font-face:bold">* * * * *</b> (**Minute Hour Day Month Week**)
| 名稱 | 允許值 (整數) |
| -------- | -------- |
| Minute (分鐘) | 0 至 59,或 * (無指定) |
| Hour (時) | 0 至 23,或 * (無指定) |
| Day of the month (日) | 1 至 31,或 * (無指定) |
| Month (月) | 1 to 12,or * (無指定) |
| Day of the week (星期) | 0 to 7 (0 和 7 both 皆為星期日),或 * (無指定) |
:::
:::info
<i class="fa fa-paperclip fa-20" aria-hidden="true"></i> **附註:** 若有多版本檔案備份需求,需啟用 Bucket Versioning 功能,請參考 S3 Browser 說明: [How to Enable or Disable Versioning for a Bucket](https://s3browser.com/amazon-s3-versioning.aspx)。
:::
### 從 COS 還原備份/同步之檔案
若遇虛擬運算個體/容器之資料誤刪或資料遺失,可使用還原的功能復原。還原有兩種方式:備份還原與同步還原。
<span class = "number">❶</span>**備份還原**會將所有 COS 備份之資料還原至主機,兩邊不同之資料仍會保存於主機。
<span class = "number">❷</span>**同步還原**則會將 COS 同步之資料完整還原至主機,兩邊不同之資料會以 COS 為主。
- **備份還原**
```
s3cmd sync s3://<DEST_BUCKET>/ /<LOCAL_DIR>/
```
- **同步還原**
```
s3cmd sync --delete-removed s3://<DEST_BUCKET>/ /<LOCAL_DIR>/
```
### 其他操作 COS 指令
s3cmd 除了能夠備份/同步、還原資料,也能對 COS 儲存體執行一般操作:
- 列出所有儲存體
```bash=
$ s3cmd ls
```
- 建立儲存體
```bash=
$ s3cmd mb s3://<BUCKET_NAME>
```
- 上傳檔案
```bash=
$ s3cmd put <LOCAL_FILE> s3://<BUCKET_NAME>
```
- 列出儲存體之所有檔案
```bash=
$ s3cmd ls s3://<BUCKET_NAME>
```
- 刪除檔案
```bash=
$ s3cmd rm s3://<BUCKET_NAME>/<FILE_NAME>
```
- 刪除儲存體大量檔案 (例:`gpu-burn` 資料夾下之所有檔案)
```bash=
$ s3cmd del s3://<BUCKET_NAME>/gpu-burn/*
```
- 刪除儲存體之資料夾
```bash=
$ s3cmd del --recursive s3://<BUCKET_NAME>/<FOLDER_NAME>/
```
- 刪除儲存體
```bash=
$ s3cmd rb s3://<BUCKET_NAME>
```
:::info
<i class="fa fa-paperclip fa-20" aria-hidden="true"></i> **附註:** [更多 s3cmd 指令操作教學](https://s3tools.org/usage)
:::
<!--
:::spoiler COS 檔案加密方式 (請點我)
TWCC 雲端儲存系統,除了提供台灣企業點對點 (End to End) 加密資料傳輸外,也結合 Intel 處理器、雲端儲存及 Intel 進階加密指令集 (Intel AES-NI) 技術,以及 Seagate 的世界級儲存解決方案,使用國際標準 256 位元 AES 的資料加密機制,保護使用者上傳的機敏資料。
使用者可使用 S3 SSE-C (Server Side Encryption - Customer) AES256 加密機制,將上傳的檔案進行加密,步驟如下:
1. 安裝工具
```bash=
curl "https://awscli.amazonaws.com/awscli-exe-linux-x86_64.zip" -o "awscliv2.zip"
sudo apt install unzip
unzip awscliv2.zip
sudo ./aws/install
```
2. 輸入以下設定指令後,放入您的 COS key (Access key、Secret key)
```bash=
aws configure
```

3. 產生加密 Key
```bash=
openssl rand -out sse-c.key 32
```
4. 使用 S3 SSE-C 加密上傳的檔案
```bash=
aws s3 cp <FILE_NAME> s3://<BUCKET_NAME>/<FILE_NAME> --sse-c AES256 --sse-c-key fileb://<ENCRYPT_KEY> --endpoint-url https://cos.twcc.ai
```
6. 使用加密 Key 下載 S3 SSE-C 加密的檔案
```bash=
aws s3 cp s3://<BUCKET_NAME>/<FILE_NAME> sse-c-test-file --sse-c AES256 --sse-c-key fileb://<ENCRYPT_KEY> --endpoint-url https://cos.twcc.ai
```
:::danger
<i class="fa fa-exclamation-triangle fa-20" aria-hidden="true"></i> **重要:**
* 若沒有加密 Key 則無法正常下載,請您妥善保存 key

:::
-->
## Duplicati:適用 VCS 個體 (Windows)
### 下載與安裝 Duplicati
+ 至[ Duplicati 下載頁面](https://www.duplicati.com/download)下載並安裝適合 Windows 作業系統的最新版本。

### 將資料備份至 COS
安裝完成後,即可開始將虛擬運算個體與容器資料保存至 COS 儲存體。
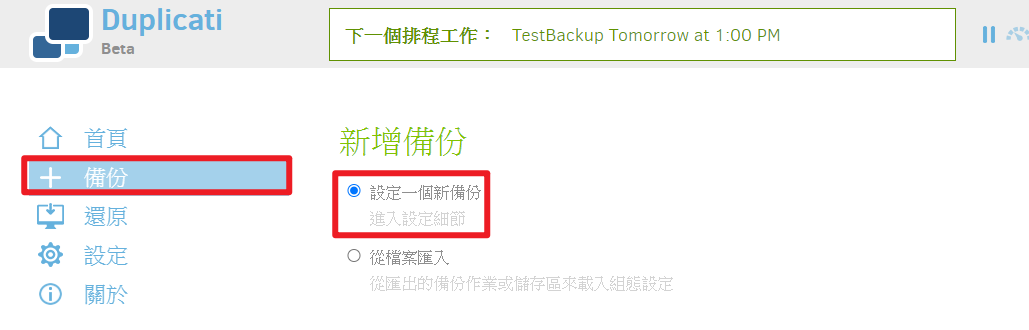
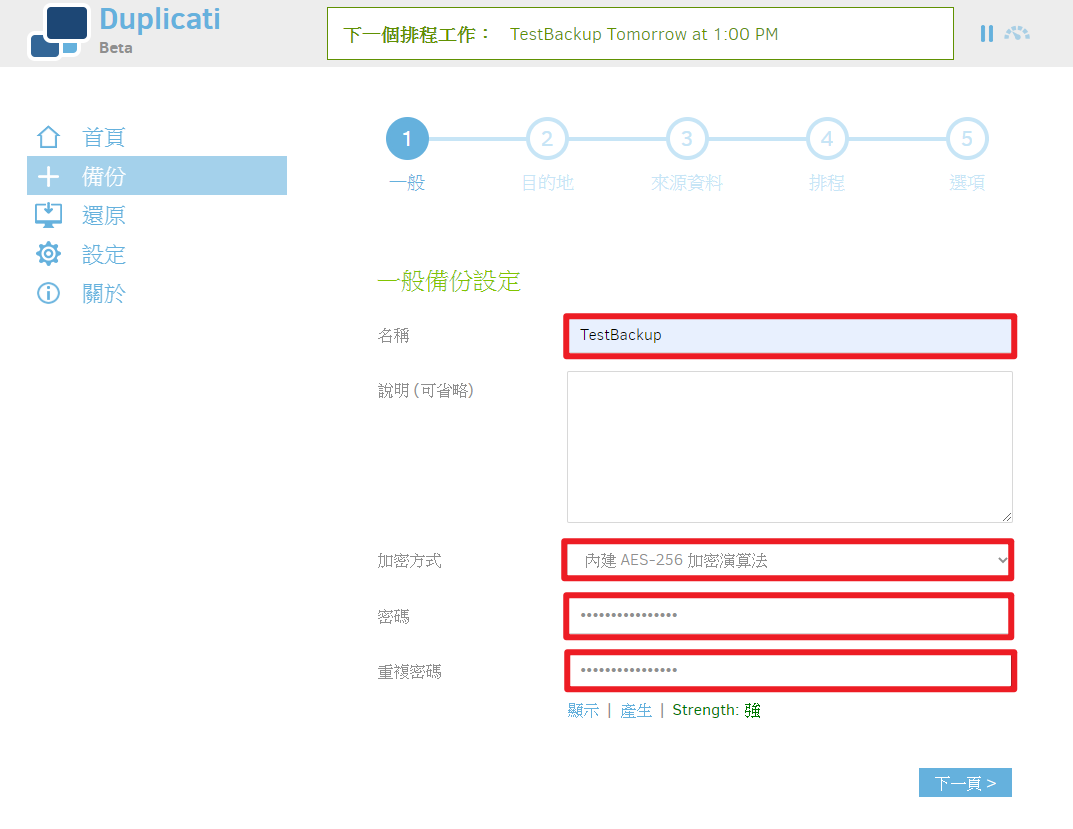
**1. 新增備份設定**
選擇 「+ 備份」,並選擇「設定一個新備份」
設備備份名稱,加密方式選擇「內建AES-256加密演算法」,並輸入加密的密碼
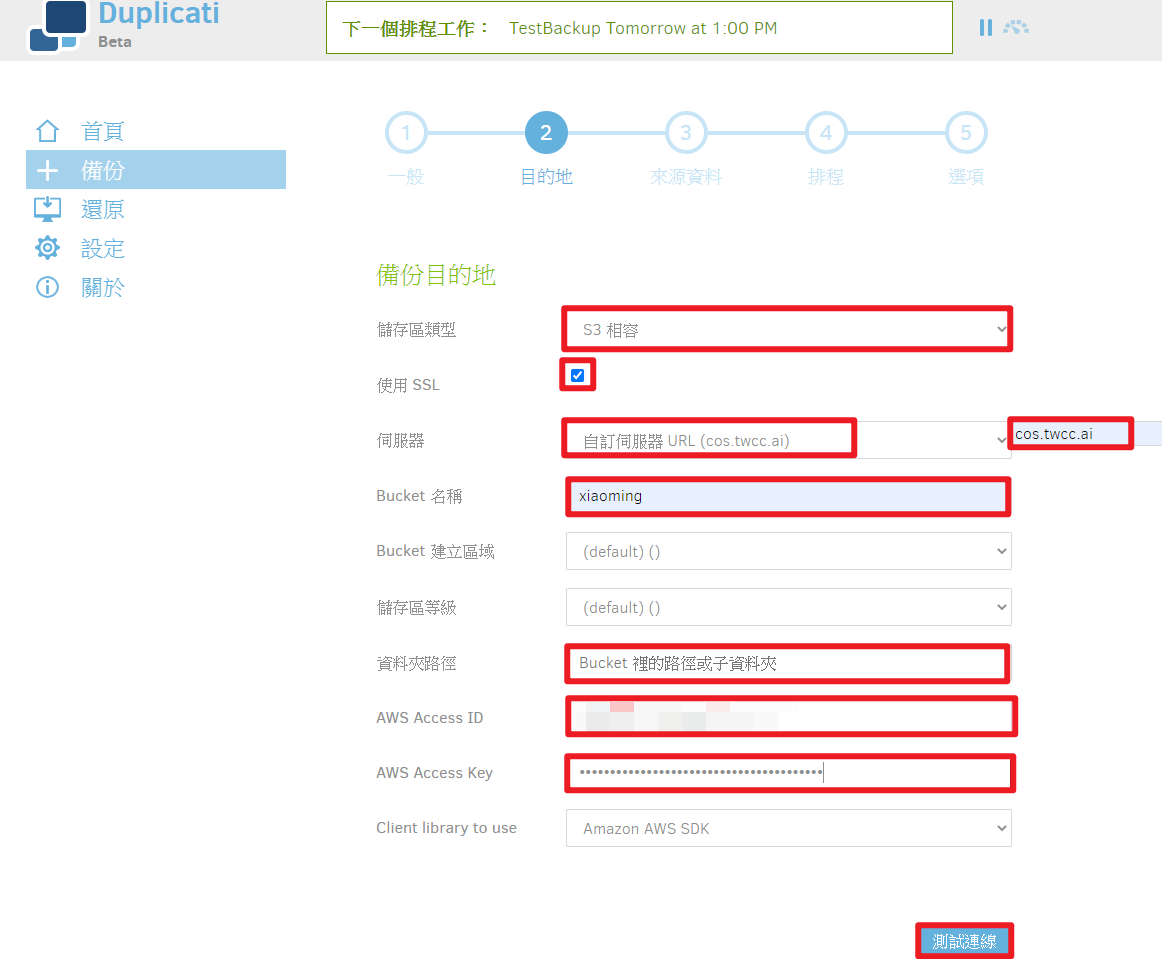
**2. 設定備份目的地**
- 儲存區類型:S3 相容
- 使用 SSL:請勾選
- 伺服器:「自訂伺服器 URL」,並輸入 `cos.twcc.ai`
- Bucket 名稱: 輸入備份的儲存體名稱
- AWS Access ID/Key:分別輸入 COS Access Key、Secret Key
:::info
<i class="fa fa-paperclip fa-20" aria-hidden="true"></i> **附註:**
1. COS 公開儲存體 Key 可在 TWCC 頁面,點擊「服務列表」>「雲端物件儲存」>「連線資訊」的「公共空間」頁面取得:
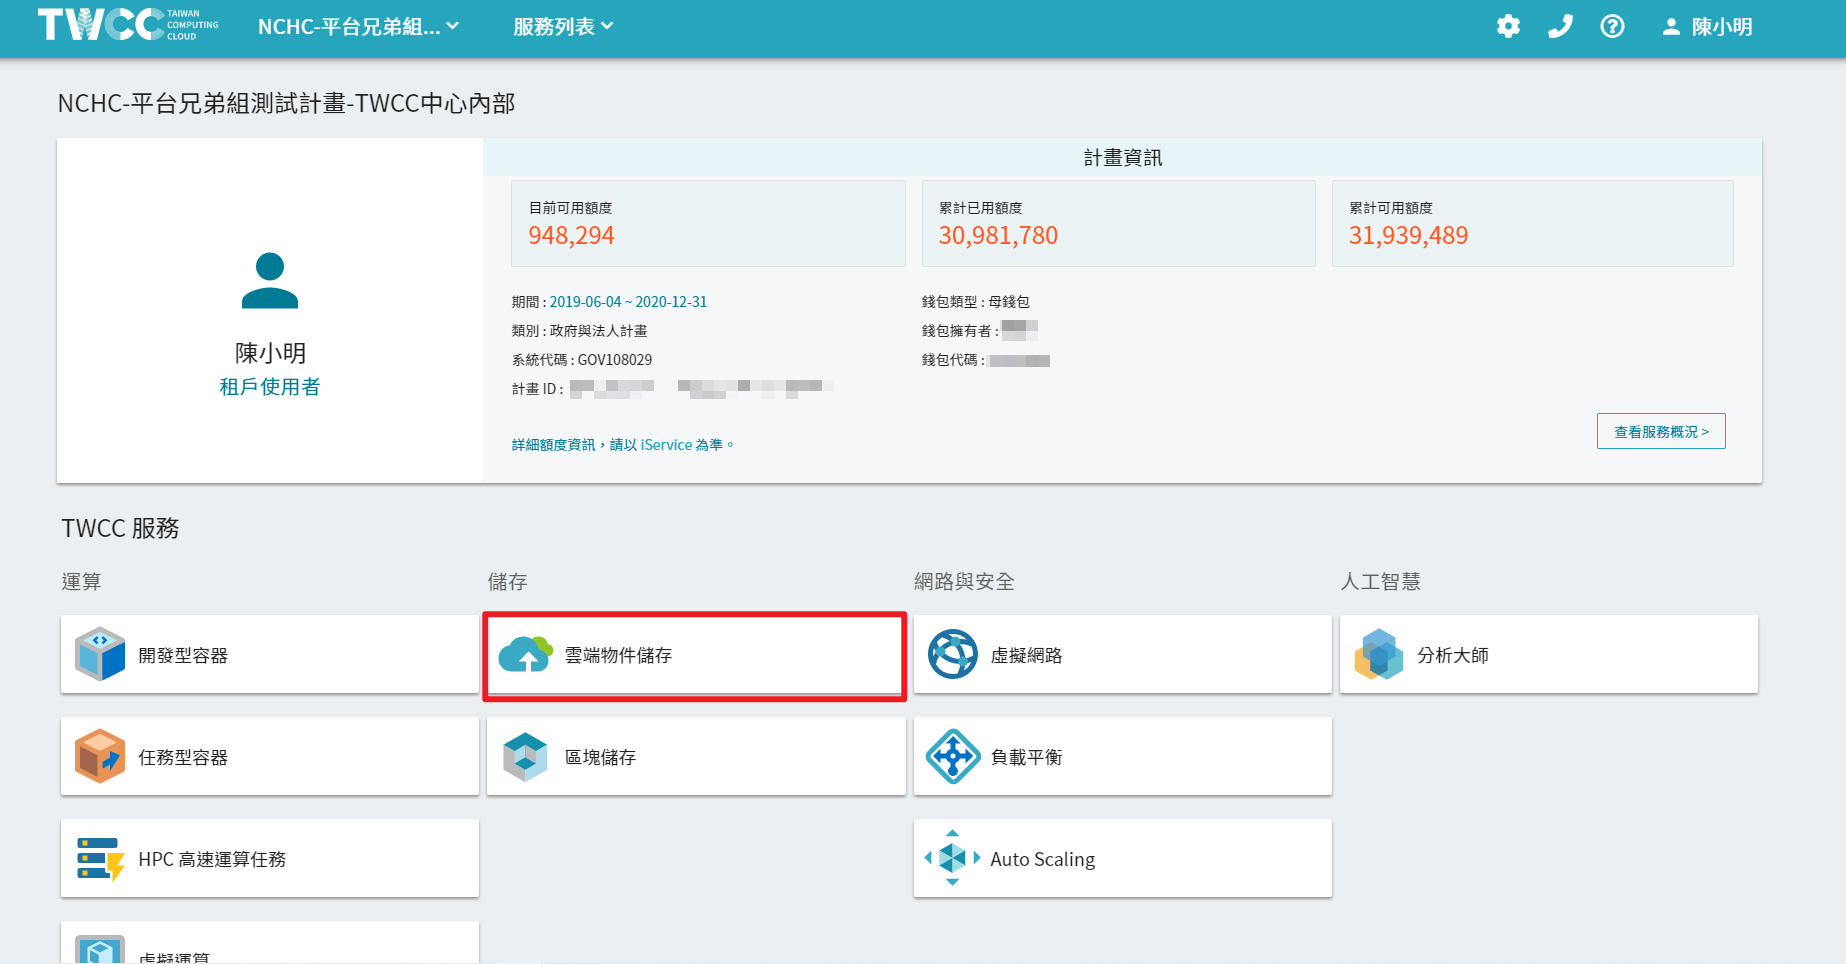

2. 私有儲存體 Key 則可在「連線資訊」的「私有空間」頁面,點選「建立金鑰」取得:

:::
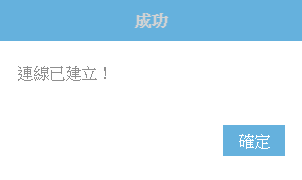
- 資訊輸入完成後,請點擊「測試連線」。若設定正確,視窗將顯示連線已建立。
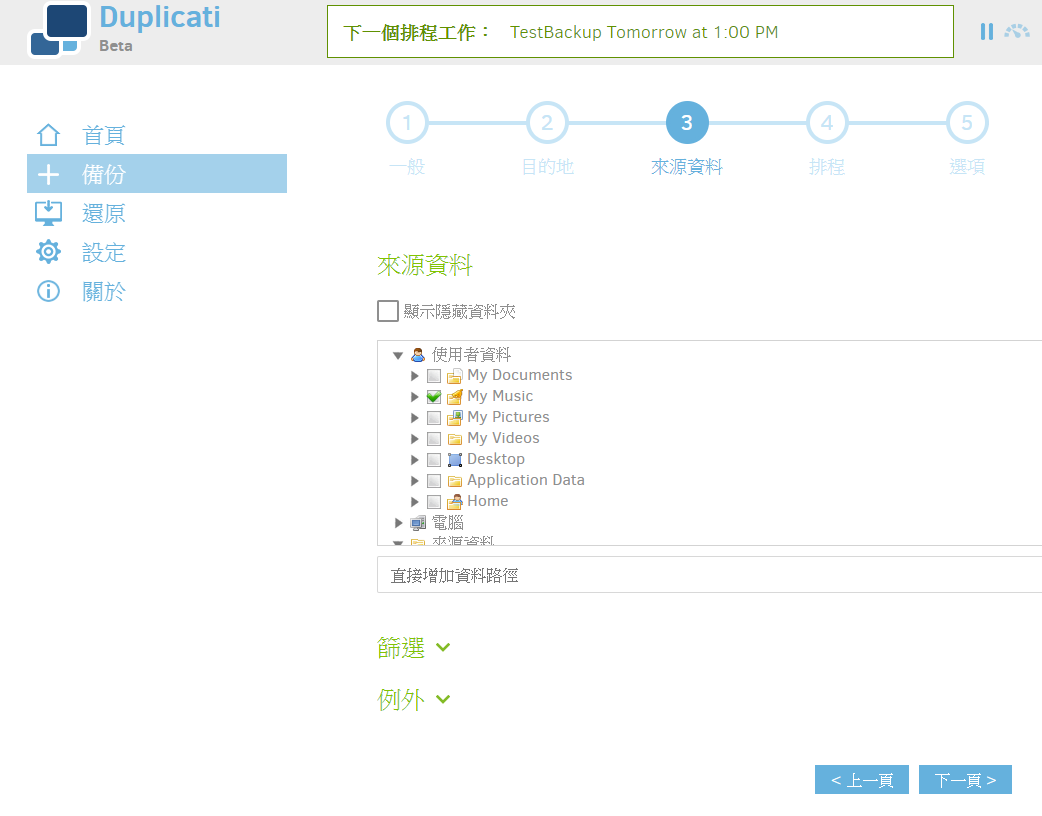
**3. 設定備份來源資料與時間**
- 選擇本機端您需要備份的資料夾或檔案
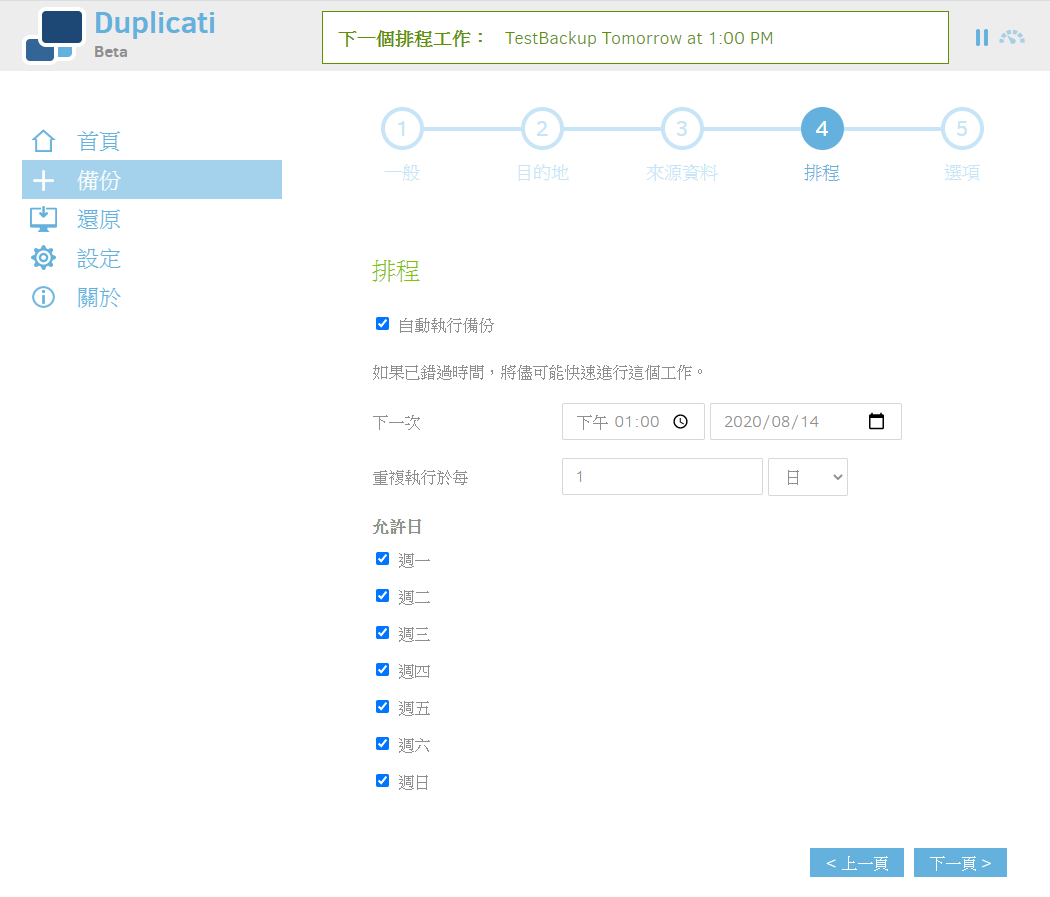
**4. 設定自動備份排程**
例:每天下午 1 點自動定期備份
5. 設定備份選項、儲存設定
區塊儲存大小選擇預設值即可 (若您的網速低,可調降數值);保留備份數目可依您的需求選擇。
選擇適合您需求的保留備份數目 (*保留所有備份、刪除指定條件以前的備份、保留指定份數的備份、智慧管理備份數,或自訂備份保留規則*)
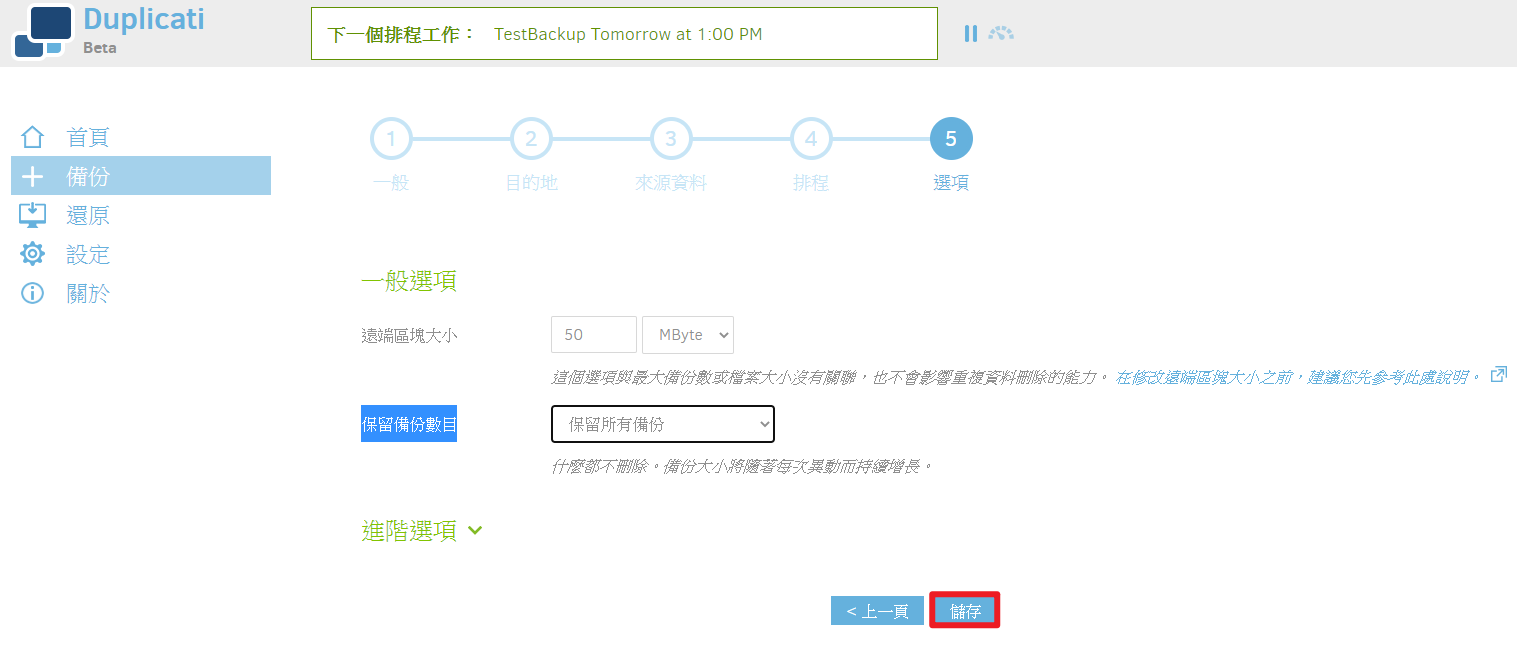
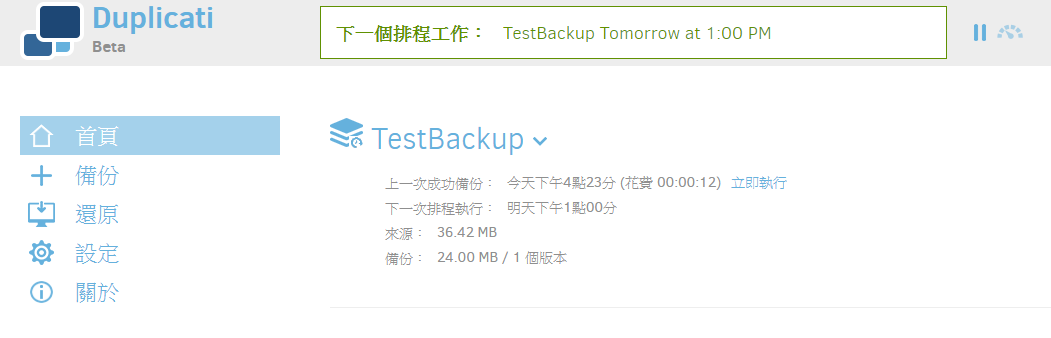
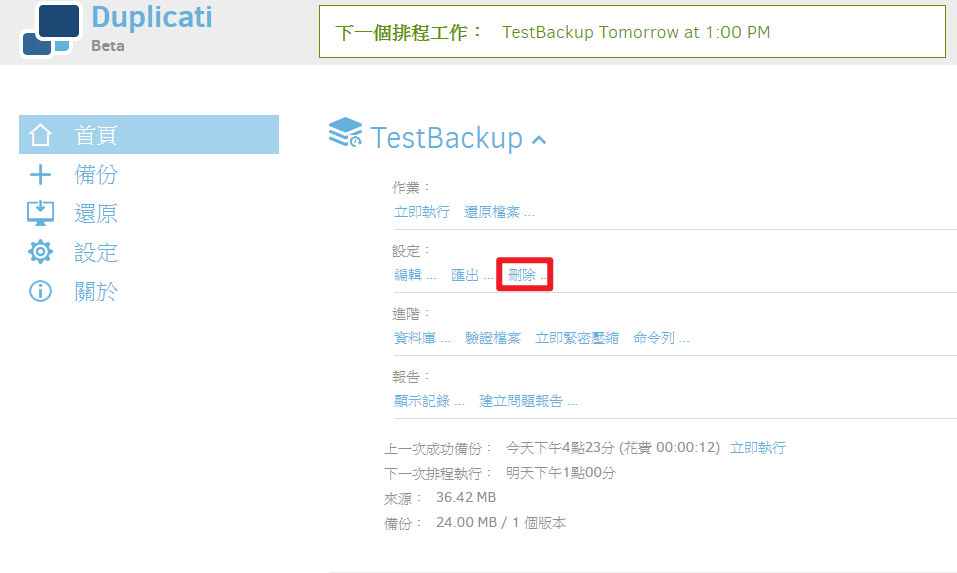
- 點選「儲存」以儲存設定。完成後主頁將顯示下一個備份排程工作、備份設定
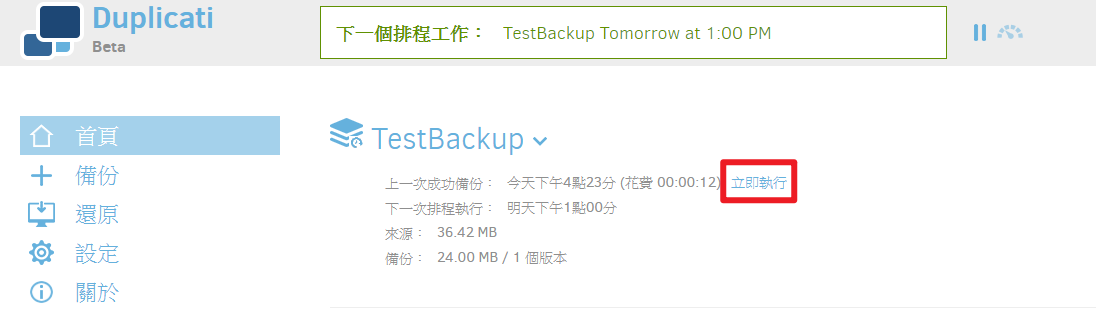
- 若您需即刻執行備份,請點選「立即執行」
- 若不需再備份資料,請點選「刪除」以刪除設定檔
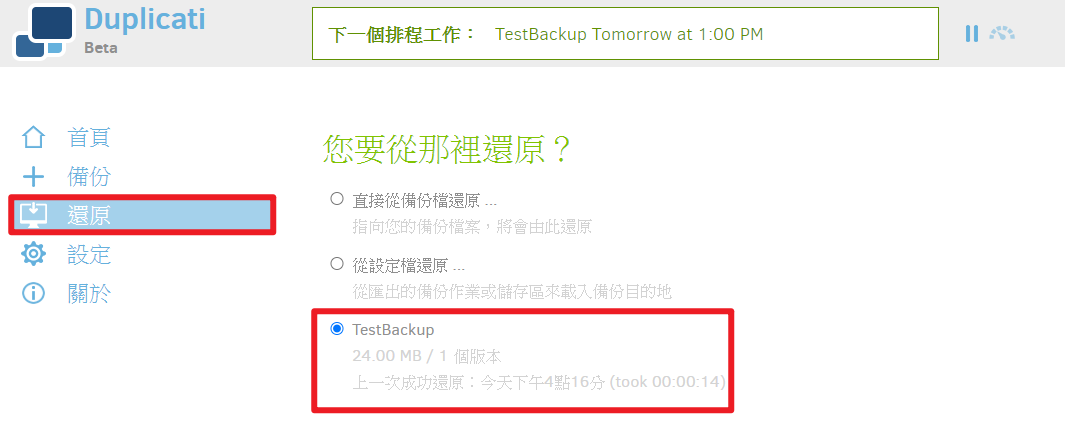
### 從 COS 還原備份檔案
**1. 設定還原設定檔**
點選還原,並選擇你需要的備份設定檔
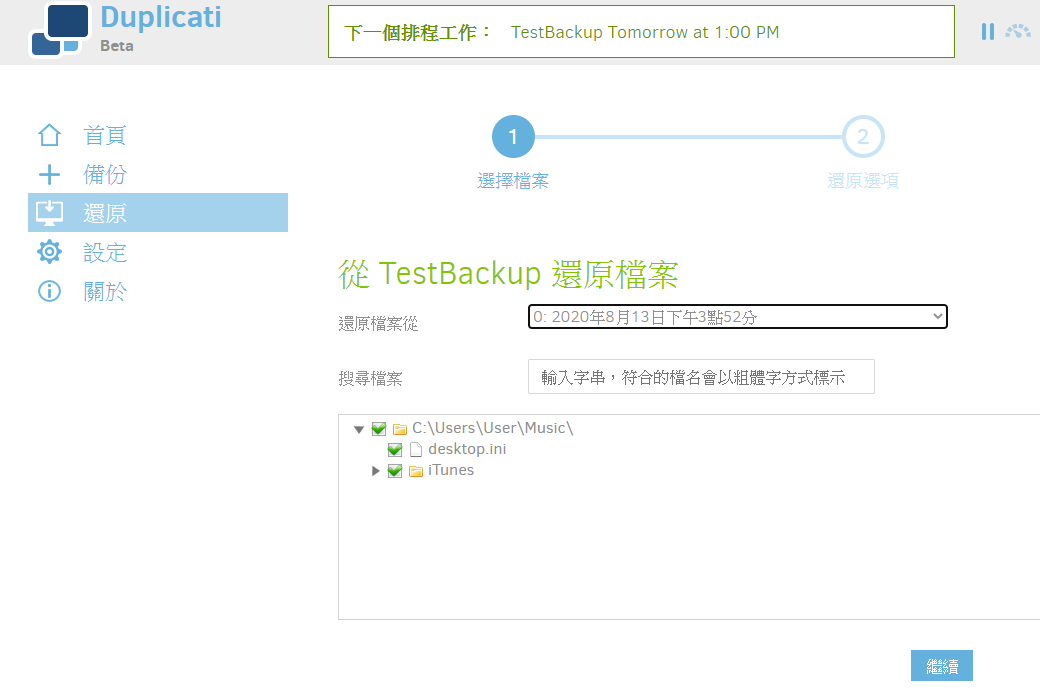
**2. 選擇檔案**
選擇備份的版本,並選擇您需備份的檔案與資料夾
**3. 設定還原選項**
設定符合您需求的選項,並點選「還原」以開始還原
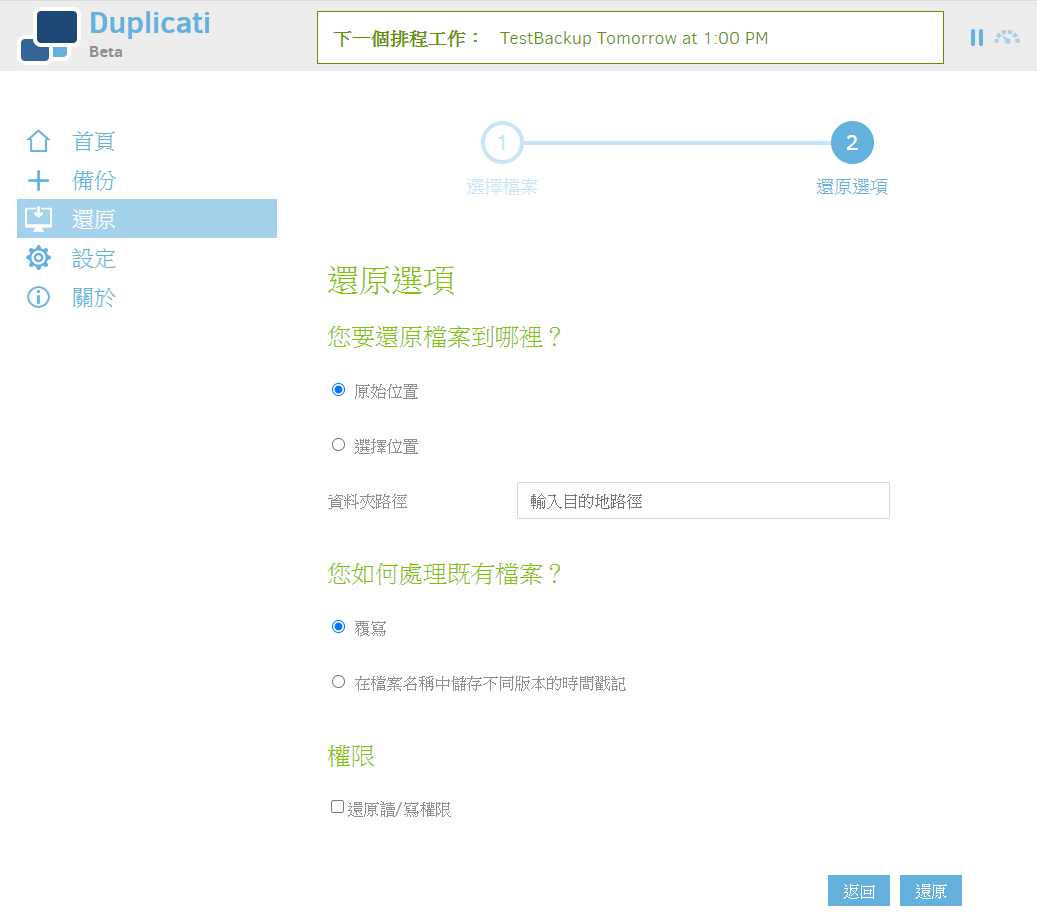
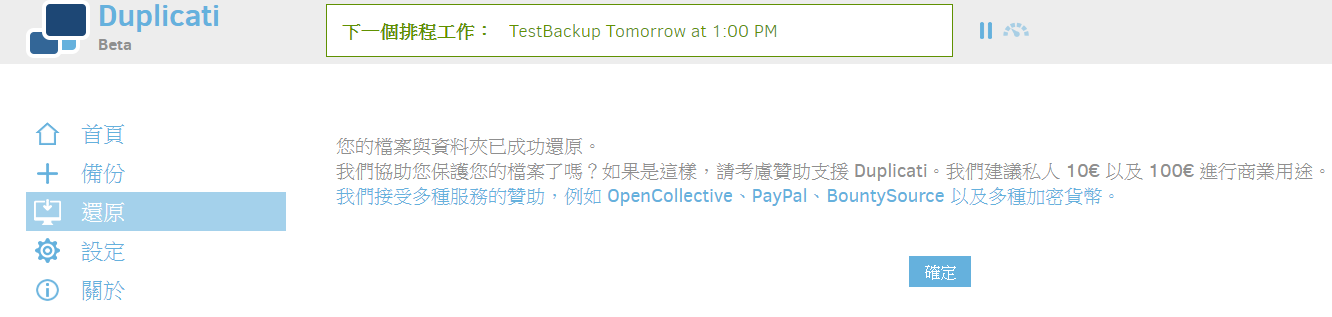
完成還原後,將顯示*您的檔案與資料夾已成功還原。*