---
title: Taiwania2
tags: Guide, TWNIA2, EN
GA: UA-155999456-1
---
{%hackmd @docsharedstyle/default %}
# Taiwania2 (HPC CLI)
# 1. Introduction to Taiwania2
HPC refers to a stack of clusters to accomplish specific computing tasks through a large number of high-performance hardware stacks. Taiwan Shan 2 offers up to 252 high-performance mainframes for users to perform calculations. Through the collection of efficient hardware, users are provided with high-performance resources to complete the computing work, so a clustered scheduling system with reasonable specifications is needed to coordinate the task.
Taiwan Shan 2 uses the international open source software Slurm as a resource scheduling software. Slurm is a fault-tolerant and highly scalable cluster management system for large and small Linux clusters. It has become the resource manager used by many supercomputers. . Slurm itself does not need to be adjusted for the system kernel and is relatively independent. As a cluster management system, Slurm provides three key features:
- Exclusive or non-exclusive use of computing resources for users over a period of time
- Provide a management framework for resource allocation, execution and monitoring on compute nodes
- Arbitration of resource allocation through Scheduled Work Queue
Because HPC's clustering tasks have some special features, to take advantage of high-performance computing, you must support parallel computing, or run distributed jobs that are not dependent on each other on the cluster, so this document will also introduce the knowledge of parallel computing and How to use it. A large number of devices also require a reliable monitoring and management system, and Slurm itself provides basic operations for users to monitor, as described below.
# 2. Log in to the Login Node
## 2-1. Preparing information
### 2-1-1. Wiring tools
- SSH: Windows users please download the SSH client software (example: [PuTTY] (https://www.chiark.greenend.org.uk/~sgtatham/putty/latest.html)); macOS users can directly open the built-in terminal Machine connection
### 2-1-2. Login Information
- Login node: `ln01.twcc.ai`
- TWCC HPC Hostname and Password
- If you have not already registered the hostname, please refer to: [Register TWCC Account](https://new.twcc.ai/doc?page=register_account) , [Apply Available Programs](https://www.twcc.ai/doc?page=Project)
- Forgot password? Please refer to: [Check hostname, password and OTP](https://man.twcc.ai/@twccdocs/guide-service-hostname-pwd-otp-en#%E9%87%8D%E7%BD%AE%E4%B8%BB%E6%A9%9F%E5%AF%86%E7%A2%BC).
- OTP (One Time Password):
- Login TWCC HPC In addition to the host password, OTP is required to ensure high security
- **If the host password = abc, OTP = 12345, the login password is abc12345**
- For OTP details, see [Check hostname, password and OTP](https://man.twcc.ai/@twccdocs/guide-service-hostname-pwd-otp-en).
<!--
-->
## 2-2. Login Steps
### 2-2-1. Windows users
#### Step 1. Open PuTTY
- After opening, fill in the information and click Open again.
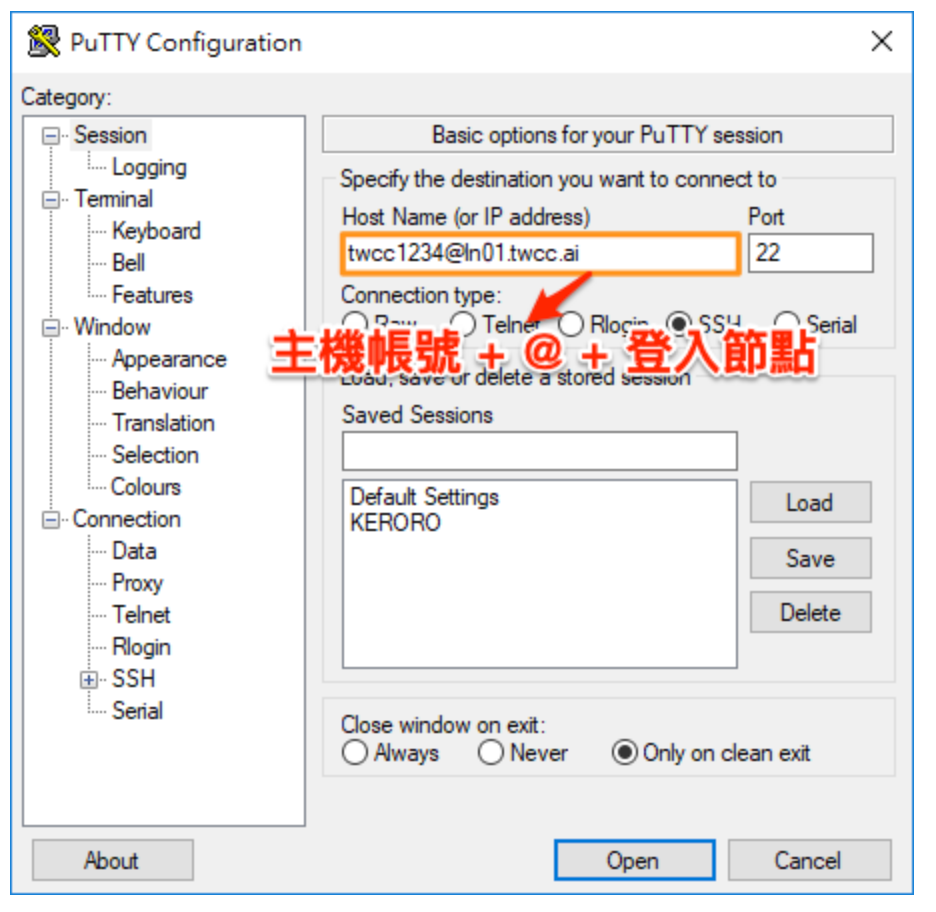
#### Step 2. Enter the host password + OTP
- Upon completion, the terminal will be opened via PuTTY and logged into the HPC Service in TWCC. Please enter the host password + OTP
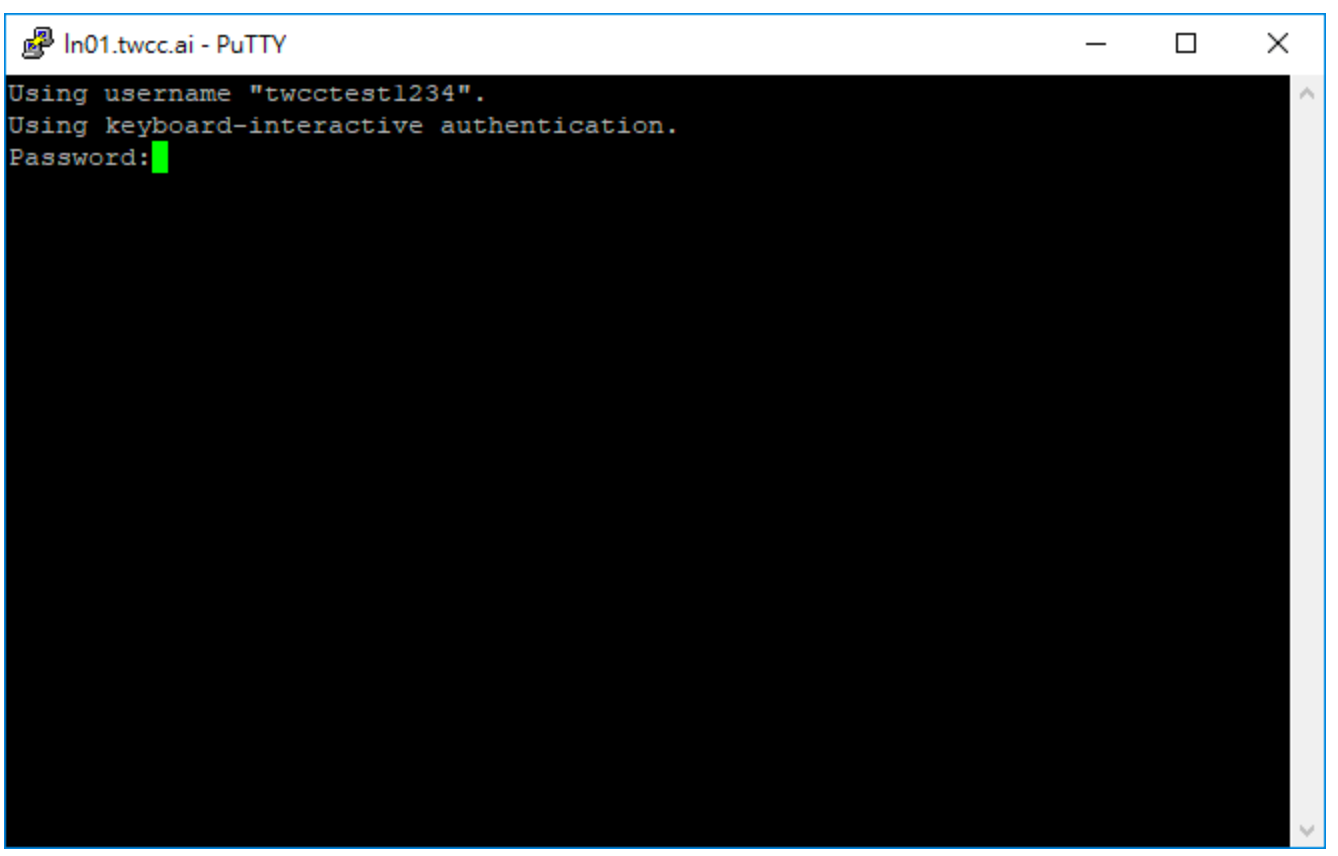
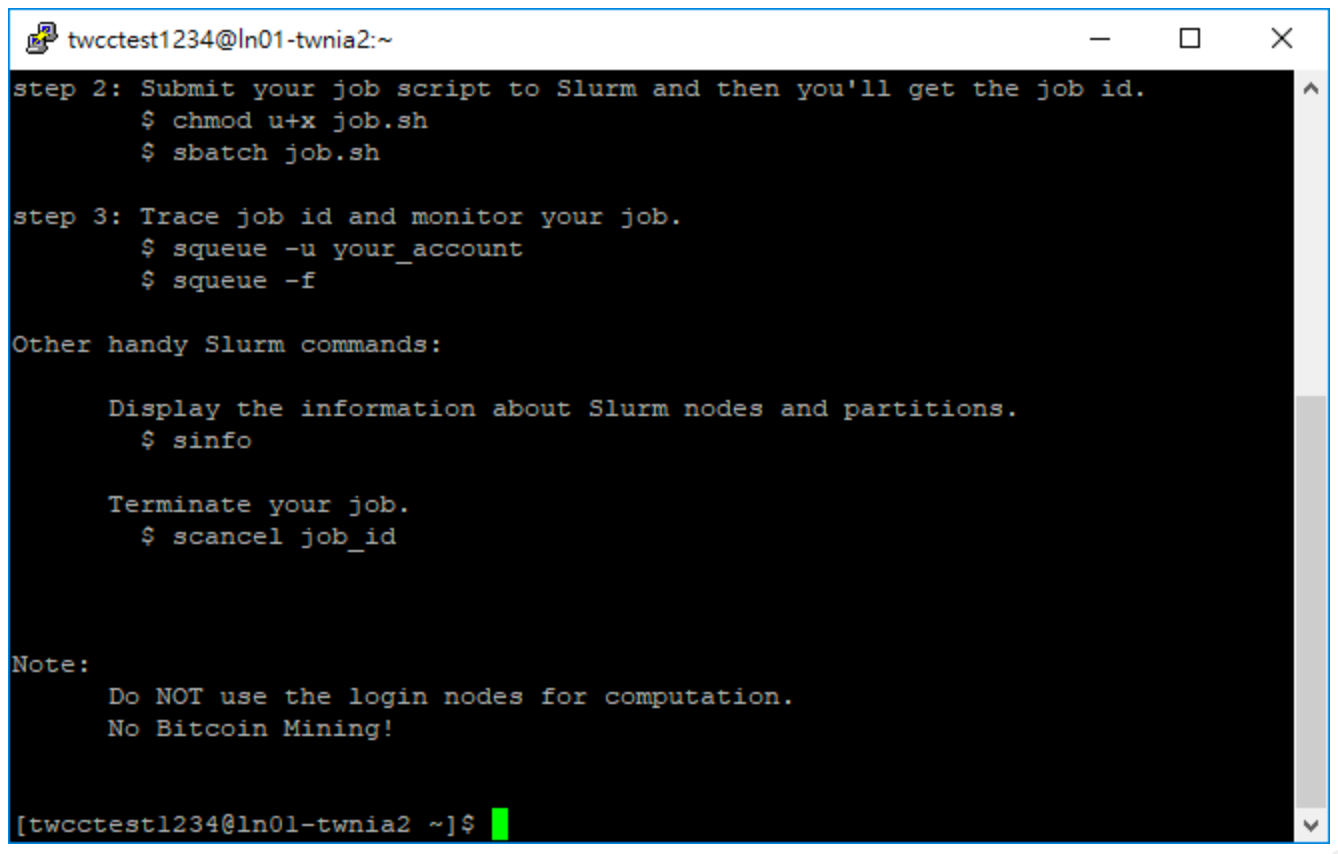
- The following screen will be displayed after normal login
### 2-2-2. macOS User
#### Step 1. Open the built-in terminal of the computer and input the information.
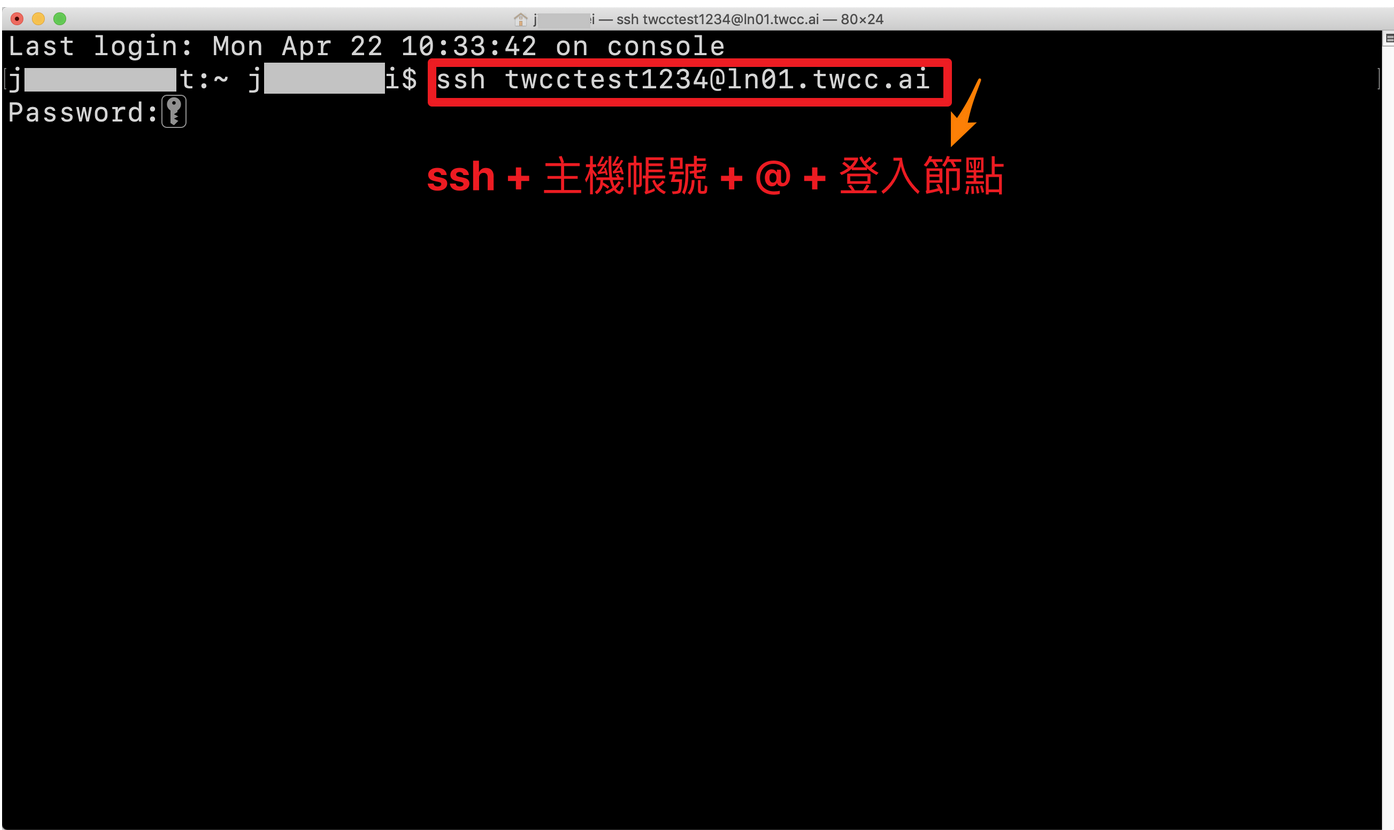
#### Step 2. Enter the host password + OTP
- Enter the host password + OTP. The following screen will be displayed after normal login.
# 3. Log in to the Data Transfer Node
:::info
:book: 參見 [HFS 高速儲存服務](https://new.twcc.ai/doc?page=gpfs)
:::
# 4. Slurm Instructions for use
This chapter will explain the basic architecture of Slurm, provide the user's basic knowledge, and further explain how to submit tasks, manage tasks and resources through Slurm.
## 4-1. Slurm Basic Description
### 4-1-1. Introduction to Slurm Architecture
Slurm runs a Slurm daemon on each compute node, referred to as slurmd. Slurmd is used to manage compute nodes, including monitoring tasks running on that node, accepting tasks from the controller, and dispatching the task to compute nodes. If the controller makes a request, slurmd can also stop the task, as shown below.
Slurmd provides a fault-tolerant hierarchical communication mechanism with related commands: sacct, salloc, sattach, sbatch, sbcast, scancel, scontrol, sinfo, smap, squeue, srun, strigger, and sview. All commands can be run on any node in the cluster.
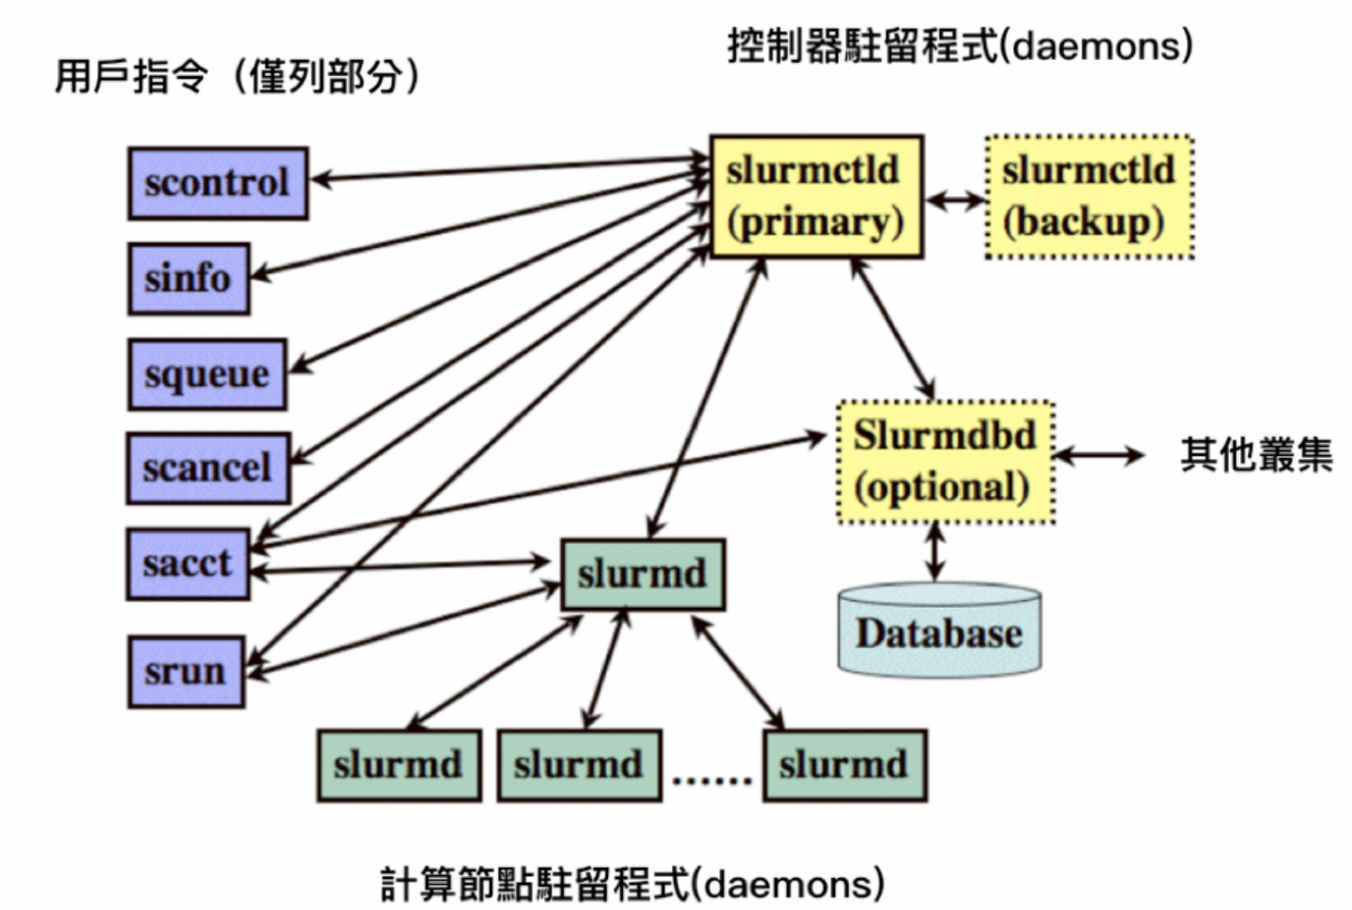
Clusters within this architecture are not just random combinations of compute nodes. These nodes can be partitioned, and a single node can be set repeatedly to achieve the highest benefit of parallel operations, allowing the controller to dispatch work to the partition. The partition is managed in units of units. Each partition has its own management policy, such as limiting specific users, task resource size limits, and task runtime limits. Tasks can also be executed in the partition according to the priority order, and the resources in the partition are configured in sequence until the resources are exhausted. When the controller assigns a compute node to a task, the user can run a single task on that node, or group many tasks into a task set to perform batch tasks. The concept of Slurm partitioning can be based on physical machine and network allocation adjustments to ensure low latency of the compute nodes.
### 4-1-2. System login node and data transfer node
The user will connect to a shared node. The purpose of the shared node is to let the user submit tasks, edit programs, monitor task status, etc. through this machine. The login node of this system is "ln01.twcc.ai" or "ln02.twcc.ai". Users can log in at the same time. Only the two login nodes can submit tasks.
On the file transfer node, mount HFS to /home (softlink for /fs02) and /work (softlink for /fs01). Users can create directories with their own host accounts in these two directories. And file management in this directory. HFS will be mounted to the same directory of all GPU nodes at the same time, so after the user uploads the file to HFS through the file transfer node, the user can use the above HPC service, or the container on www.twcc.ai, The HPC High Speed Computing Service accesses content in HFS.
Disk space limit. Currently planned, personal and public disk space is verified as follows:
/home/username directory: home directory for each account, 100 GB free
/work/username directory: public directory for each account, 100 GB free of charge
### 4-1-3. System operation node
The service provides up to 252 computing nodes. These computing nodes mainly perform heavy computing tasks. The system will submit tasks through the above-mentioned login node, and the task will be dispatched by the Slurm Master to deliver the tasks to the available computing nodes. Users can view the status of the task directly through the login node using Slurm related instructions, and will not directly touch these computing nodes.
## 4-2. Submit the first Slurm task
To understand Slurm's workflow correctly, you need to understand some basic concepts:
- Node: Install and properly configure each node. slurmd is an arithmetic node. Install slurmctld as the Slurm Master node.
- Partition: A partition is a set of nodes that can be queued for tasks through partitions.
- Job: In the traditional sense, a task is to run a script or program, but in the case of Slurm, a task is a resource application and allocation for a user at a specific time, allowing the user to run an arithmetic task.
- Job Step: Slrum has the concept of task steps, which can be understood as subtasks. This concept allows users to split computing resources into different subtasks within a task.
### 4-2-1. Partitioning concept
The basic concepts of nodes, partitions, tasks, and task steps have been introduced above. Before submitting tasks, learn more about the purpose of partitions.
Different nodes, due to different network characteristics and hardware configuration, can help users to more easily determine the characteristics of nodes by partitioning to select the node that is most suitable for their operation. In addition, if some machines in the cluster are private, partitioning allows some users to submit tasks only in dedicated partitions.
At present, the system only sets a common partition, the name is SlurmDefault, which is also the default partition where the user submits the task. If there is no specially designated task, it will run in this partition. In the future, the center will distinguish different partitions for users according to the needs of different users.
### 4-2-2. Submitting tasks using partitions
There are a variety of task submission methods in Slurm, namely sbatch, srun and salloc, sbatch is the main usage of this article, which will be used in the following chapters, and srun and salloc will be explained in the 2.6 interactive task chapter.
Before submitting a task with sbatch as an example, the user needs to edit the content to be run as a script, and then specify the parameters and scripts through the sbatch command. The following is the simplest bash schoolbook, named test.sh.
<div style="background-color:black;color:white;padding:20px;">
#! /bin/bash
Echo "Hello World"
Date
Hostname
Sleep 60
Echo "Bye"
</div>
The script will output "Hello World", current time, node name, and output "Bye" after 60 seconds of sleep. You can use the following command to specify a specific partition and submit this task script. In the following example, use "-p" for the specified partition (partition), and then directly specify test.sh. SlurmDefault is the name of the partition. Since SlurmDefault is the default partition, it will run on this partition if it is not specified.
<div style="background-color:black;color:white;padding:20px;">
$ sbatch –p SlurmDefault test.sh
Submitted batch job 2910
</div>
After the task is submitted, you will get a Job ID. The Job ID obtained by the above example is 2910. You can see the file of slurm-2910.out in the directory where the Job is submitted. There is related Log information, as follows:
<div style="background-color:black;color:white;padding:20px;">
Hello World
Wed Dec 5 10:40:46 CST 2018
Gn1201.twcc.ai
Bye
</div>
## 4-3. Specifying task parameters
### 4-3-1. Specifying parameters by command
The simplest task submission method is described in the previous section. After the script is edited, it is dispatched by Slurm, and the script will run on the appropriate partition and get the output. Slurm itself provides different parameters for users to specify their tasks to run on specific nodes, partitions, and even resource sizes. The following example shows how to run a specified task by specifying parameters.
Suppose a task requires three nodes to operate simultaneously, and each node's memory is not lower than 8G, you can use the following method. "--node" can specify the number of nodes to run, "--mem" can specify the size of the running memory, "--partition" has the same meaning as "-p", that is, specify the name of the running partition. Finally, specify the script to run.
<div style="background-color:black;color:white;padding:20px;">
$ sbatch --nodes=3 --mem=8192 --partition=SlurmDefault test.sh
</div>
Let's take a more complicated example. Specify to run three machines via "--node", "--mem" specifies 8GB of memory, and "--nodelist" specifies gn1201.twcc.ai, gn1204.twcc.ai , gn1205.twcc.ai three machines, and through the "--cpus-per-task" can specify each processor to use a two-core CPU.
<div style="background-color:black;color:white;padding:20px;">
$ sbatch --nodes=3 --mem=8192 --nodelist=gn1201.twcc.ai,gn1204.twcc.ai,gn1205.twcc.ai --cpus-per-task=2 test.sh
</div>
In addition to the above example, sbatch can also specify more different parameters, which can be directly understood by the following command "sbatch --help".
### 4-3-2. Specifying parameters via script comments
The way to specify parameters via directives is simple, but it's not convenient to reuse, so Slurm provides another way to specify parameters via script comments, which Slurm will automatically parse. We can use the test.sh above to make changes, and fill in the contents of the above examples directly into the script.
<div style="background-color:black;color:white;padding:20px;">
#! /bin/bash
#Batch Job Paremeters
#SBATCH --nodes=3
#SBATCH --mem=8192
#SBATCH --nodelist=gn1201.twcc.ai,gn1204.twcc.ai,gn1205.twcc.ai
#SBATCH --cpus-per-task=2
#Operations
Echo "Hello World"
Date
Hostname
Sleep 60
Echo "Bye"
</div>
In the script, you can directly set the parameters through the above example "#SBATCH", and finally directly send the script through "sbatch test.sh" with these parameters.
### 4-3-3. Frequently Asked Questions
In this system, each computing node uses 32 CPU cores. If the user wants to submit a 36-core computing task, the job will never run and continue to display the Pending state. Why? This is a lot of people's misunderstanding of the resource scheduling system, because the computing resources are not automatically integrated, the scheduling system will not automatically split the task to run. Even though the system can perform task dispatching as a target through partitioning, a single partition cannot be used as a single computing node.
If the user wants to run a single task with more than one computing node's resources, the user needs to reduce the resource usage of a single task and change to multiple parallel computing operations to achieve the requirement of using multiple computing resources.
## 4-4. Confirm task status
The previous section describes how to submit a task and set parameters related to the task. This section describes how to view the status of the task. Slurm provides a variety of instructions to help users view the status of the task, including scontrol, squeue, and how to use it below.
### 4-4-1. Related instructions
#### scontrol
The status status of the task can be viewed through scontrol show job. If you use scontrol show job [job_id] to view the detailed status of a specific task. as follows:
<div style="background-color:black;color:white;padding:20px;">
$ scontrol show job 2977
JobId=2977 JobName=test.sh
UserId=u9833157(11899) GroupId=TRI1071744(16528) MCS_label=N/A
Priority=4294899531 Nice=0 Account=root QOS=normal
JobState=RUNNING Reason=None Dependency=(null)
Requeue=1 Restarts=0 BatchFlag=1 Reboot=0 ExitCode=0:0
RunTime=00:00:45 TimeLimit=1-00:00:00 TimeMin=N/A
SubmitTime=2018-12-06T11:39:35 EligibleTime=2018-12-06T11:39:35
StartTime=2018-12-06T11:39:36 EndTime=2018-12-07T11:39:36 Deadline=N/A
PreemptTime=None SuspendTime=None SecsPreSuspend=0
LastSchedEval=2018-12-06T11:39:36
Partition=SlurmDefault AllocNode:Sid=un-ln01:167797
ReqNodeList=(null) ExcNodeList=(null)
NodeList=gn0312.twcc.ai, gn1229.twcc.ai, gn1230.twcc.ai
BatchHost=gn0312.twcc.ai
NumNodes=3 NumCPUs=6 NumTasks=3 CPUs/Task=2 ReqB:S:C:T=0:0:*:*
TRES=cpu=6, mem=24G, node=3, billing=6
Socks/Node=* NtasksPerN:B :S:C=0:0:*:* CoreSpec=*
MinCPUsNode=2 MinMemoryNode=8G MinTmpDiskNode=0
Features=(null) DelayBoot=00:00:00
Gres=(null) Reservation=(null)
OverSubscribe=OK Contiguous=0 Licenses=(null) Network=(null)
Command=/fs02/u9833157/test.sh
WorkDir=/fs02/u9833157
StdErr=/fs02/u9833157/slurm-2977.out
StdIn=/dev/null
StdOut=/fs02/u9833157/slurm-2977.out
Power=
</div>
Here you can see a lot of messages, including user information for running this task, time information about the task, running node information, running resource size, executed instructions, location of the run command, and location of the output command.
#### squeue
Although the message output by scontrol is very complete, if there are a large number of tasks in the system, the response speed will be slower, the use efficiency is lower, and not necessarily all such detailed information is required, then squeue will be a better choice. The way to use squeue is as follows:
<div style="background-color:black;color:white;padding:20px;">
$ squeue
JOBID PARTITION NAME USER ST TIME NODES NODELIST(REASON)
2979 SlurmDefa test.sh u9833157 R 0:14 3 gn0312.twcc.ai, gn1229.twcc.ai, gn1230.twcc.ai
</div>
You can see the running and queued tasks from the squeue. You can see "R" from the "ST" field, indicating that it is running, and seeing "PT" indicates that it is queued. If the task is over, you will not be able to see the information via squeue and you must browse using the sacct described below.
#### sacct
Sacct displays the status of related tasks, including historical information that has ended.
<div style="background-color:black;color:white;padding:20px;">
$ sacct
JobID JobName Partition Account AllocCPUS State ExitCode
------------ ---------- ---------- ---------- -------- -- ---------- --------
2961_1 ba6fcf7e-+ SlurmDefa+ root 10 FAILED 1:0
2961_1.batch batch root 10 FAILED 1:0
2963_1 ba6fcf7e-+ SlurmDefa+ root 10 FAILED 1:0
2963_1.batch batch root 10 FAILED 1:0
2976 test.sh SlurmDefa+ root 6 CANCELLED+ 0:0
2977 test.sh SlurmDefa+ root 6 COMPLETED 0:0
2977.batch batch root 2 COMPLETED 0:0
2979 test.sh SlurmDefa+ root 6 COMPLETED 0:0
2979.batch batch root 2 COMPLETED 0:0
2980 test.sh SlurmDefa+ root 6 PENDING 0:0
</div>
You can see directly from the status whether this task is COMPLETE, PENDING, or FAILED, and the number of CPU cores used by this task. If the beginning of ExitCode is not "0", it means that this task is in an error state.
### 4-4-2. Task life cycle
For a task, from the submission to the end, there is a state transition process, which can also be called a life cycle. After the task is sent out, it will first enter a Pending process, if the controller finds a suitable operation. The node will go directly to the running state (Running). If the task is manually deleted while waiting, the cycle ends.
During the running of the task, you can manually suspend (Suspend) and resume (Resume) tasks, or you can directly delete (Cancel) tasks. If the running task has completed what is running, the status will be changed to Completed. In addition, before submitting a task, if there is a time limit for the task to run, assuming that the task runs for longer than the limit time, the status will be changed to Timeout, and the task will end directly.
For the relevant life cycle, refer to the following Slurm life cycle conversion chart. For the message of "Other Status", refer to the task status comparison table in the next section.

### 4-4-3. Task Status Comparison Table
The following is a possible task status code for Slurm, and its meaning explanation:
| Code abbreviation | Status name | Meaning explanation |
| -------- | -------- | -------- |
| BF | BOOT_FAIL | Task aborted due to startup failure, usually due to hardware failure |
| CA | CANCELLED | The task was terminated by the user or system administrator, the task may already be running or not yet running |
| CD | COMPLETED | Each handler for a task has been executed on the compute node and no problems occur |
| CF | CONFIGURING | The task has been assigned resources, waiting for all resources to be ready, usually this state only appears for a moment |
| CG | COMPLETING | The task is completing. If there are multiple nodes working on this program at the same time, some nodes may still be running |
| F | FAILED | If ExitCode is not "0", it means there are other errors to stop this task |
| NF | NODE_FAIL | Task aborted due to hardware failure in one or more nodes |
| PD | PENDING | Task is waiting for resources to be allocated |
| PR | PREEMPTED | Mission aborted due to resource being seized |
| RV | REVOKED | Tasks have been transferred to other computing clusters |
| R | RUNNING | Task is running |
| SE | SPECIAL_EXIT | Re-queuing in special state |
ST | STOPPED | The task has been allocated after running the resource, but it stops when it receives SIGSTOP during execution. The task will continue to retain the original resource configuration.
| S | SUSPENDED | The task is suspended during execution and the resources used are released for use by other tasks |
| TO | TIMEOUT | The task ran for longer than the set limit |
## 4-5. Confirm node status
The previous section describes how to view the status of a task. Below we describe how to view the status of a node. Similar to viewing the task status, the node status can also be viewed through the instructions. The way the instructions are used is very simple, but understanding the results displayed by the system is more complicated. The following is divided into two subsections.
### 4-5-1. Related Instructions
#### sinfo
The easiest way to view node information is to use the "sinfo" command directly. This command will output all the partitions of the current system and the basic state of the node. If you just want to quickly view the available node information, it is enough to view the information provided by sinfo. It is.
You can directly use the "sinfo" command to view the partition-based browsing mode and view the status of each partition node as follows:
<div style="background-color:black;color:white;padding:20px;">
[yiching709@un-ln01 ~]$ sinfo
PARTITION AVAIL TIMELIMIT NODES STATE NODELIST
SlurmDefault* up 1-00:00:00 2 drain* gn0109.twcc.ai,gn1101.twcc.ai
SlurmDefault* up 1-00:00:00 240 drain gn0101.twcc.ai,gn0102.twcc.ai,gn0103.twcc.ai,gn0104.twcc.ai,gn0105.twcc.ai,......,gn1221.twcc.ai , gn1222.twcc.ai, gn1223.twcc.ai, gn1224.twcc.ai, gn1225.twcc.ai, gn1226.twcc.ai, gn1227.twcc.ai, gn1228.twcc.ai
SlurmDefault* up 1-00:00:00 7 idle gn0312.twcc.ai, gn0512.twcc.ai, gn0712.twcc.ai, gn1004.twcc.ai, gn1017.twcc.ai, gn1229.twcc.ai, gn1230. Twcc.ai
SlurmDefault* up 1-00:00:00 3 down gn0705.twcc.ai,gn1012.twcc.ai,gn1111.twcc.ai
</div>
In the above example, because there are too many nodes, the "..." is directly used in the section of 240 drain to omit some of the node names. In fact, all node names are displayed when used. In addition to using "sinfo" to view partition-based information, you can also view the partition and node status of each node through "sinfo -N". Also because there are too many nodes, the file example omits some results with ".....", but in fact, the results of all the nodes are displayed by the result of the command.
<div style="background-color:black;color:white;padding:20px;">
$ sinfo -N
NODELIST NODES PARTITION STATE
Gn0101.twcc.ai 1 SlurmDefault* drain
Gn0102.twcc.ai 1 SlurmDefault* drain
Gn0103.twcc.ai 1 SlurmDefault* drain
Gn0104.twcc.ai 1 SlurmDefault* drain
Gn0105.twcc.ai 1 SlurmDefault* drain
......
Gn1227.twcc.ai 1 SlurmDefault* drain
Gn1228.twcc.ai 1 SlurmDefault* drain
Gn1229.twcc.ai 1 SlurmDefault* idle
Gn1230.twcc.ai 1 SlurmDefault* idle
</div>
#### scontrol
If you want to view more detailed node information, you can use the scontrol command, which will output more detailed information, including the resource usage status of the node and the load status, node system information, software information, etc. If you want This command is recommended for specific information through slurm. The usage method is "scontrol show node <node_name>", and gn0101.twcc.ai is used as an example of the node to be viewed as follows:
<div style="background-color:black;color:white;padding:20px;">
$ scontrol show node gn0101.twcc.ai
NodeName=gn0101.twcc.ai Arch=x86_64 CoresPerSocket=18
CPUAlloc=0 CPUErr=0 CPUTot=36 CPULoad=0.43
AvailableFeatures=(null)
ActiveFeatures=(null)
Gres=gpu:8
NodeAddr=gn0101.twcc.ai NodeHostName=gn0101.twcc.ai Version=17.11
OS=Linux 3.10.0-862.el7.x86_64 #1 SMP Fri Apr 20 16:44:24 UTC 2018
RealMemory=772437 AllocMem=0 FreeMem=534061 Sockets=2 Boards=1
CoreSpecCount=2 CPUSpecList=0-1 MemSpecLimit=1024
State=IDLE+DRAIN ThreadsPerCore=1 TmpDisk=0 Weight=1 Owner=N/A MCS_label=N/A
Partitions=SlurmDefault
BootTime=2018-10-16T20:45:48 SlurmdStartTime=2018-11-08T21:14:33
CfgTRES=cpu=36, mem=772437M, billing=36, gres/gpu=8
AllocTRES=
CapWatts=n/a
CurrentWatts=0 LowestJoules=0 ConsumedJoules=0
ExtSensorsJoules=n/s ExtSensorsWatts=0 ExtSensorsTemp=n/s
Reason=node-switch [root@2018-11-23T12:49:03]
</div>
### 4-5-2. Node Status Description
There are many nodes in Slurm, and the state of the node consists of two parts: state and special service. There may be a special character in the node state, followed by the state flag of the node, so that the combined task state is more complicated, and the newbie wants to understand that there is a little difficulty, here is how to view the node state.
#### Special symbols
- a. "*": indicates that the node does not currently respond and will not assign any tasks to the node. If the node continues to respond, the node will be set to the "DOWN" state by the system, except for the node states COMPLETING, DRAINED, DRAINING, RAIL, FAILING.
- b. "~": Indicates that the node is in power save mode.
- c. "#": Indicates that the node is being started or is being configured in the control node.
- d. "$": Indicates that the node is being reserved for the status of the reservation.
- e. "@": Indicates that the node is being scheduled to be restarted.
#### Node Status
- a. ALLOCATED: This node has been assigned to one or more tasks.
- b. ALLOCATED+: The node has been assigned to one or more tasks, and a part of the tasks are in the process of completion, indicating that some of the jobs are in COMPLETING state.
- c. COMPLETEING: All tasks related to this node are in the process of completion. Slurm allows the user to specify the handler to be executed after the task is completed. When all tasks and handlers are completed and terminated, the status will be removed. .
- d. DOWN: Indicates that the node cannot be used. For example, when the node's hardware fails, Slurm automatically sets the node to this state, and the system administrator can manually configure the node to this state. If some recovery operations are performed, Slurm will automatically return the nodes to the service.
- e. DRAINED: The node does not accept user resource allocation requests, which are usually set by the system administrator.
- f. DRAINING: The node is performing the task, but after the current last task is executed, the status will be changed to DRAINED, that is, the request for user resource allocation will no longer be accepted.
- g. FAIL: The node does not accept user resource allocation requests, but the reason is that there is a problem with this node, which is different from the DRAINED status.
- h. FAILING: The node is performing a task, but due to a problem with the node, resource allocation will no longer be accepted at a specific point in time.
- i. FUTURE: The node has not been fully configured and is expected to be available at some point in the future, usually after the system is fully configured.
- j. IDLE: This node can be used but has not been assigned a task.
- k. MAINT: The node is currently in a reserved state.
- l. REBOOT: The node is preparing to restart.
- m. MIXED: The resources of this node are partially allocated.
- n. PERFCTRS (NPC): This node is used to monitor network performance, so resources cannot be configured for other tasks.
- o. POWER_DOWM: This node is currently powered off and cannot run any jobs. This status is set by the power save mode program.
- p. POWER_UP: The node is starting up. This status is set by the power saving mode program.
- q. RESERVED: This node is in advanced reservation state and usually cannot be allocated resources.
- r. UNKNOWN: During the startup of the Slurm controller, the node status is not yet determined.
#### Status Classification
There are many of the above, but we can probably divide into four major items:
- At work: ALLOCATED, ALLOCATED+, COMPLETING, DRAINING, FAILING, MIXED
- Idle: IDLE
- Not available: DOWN, DRAINED, FAIL, FUTURE, MAINT, REBOOT, PERFCTRS, POWER_DOWM, POWER_UP, RESERVED, and any characters with "#", "$", "@"
- Unknown: UNKNOWN
## 4-6. Interactive tasks
The previous section describes how to use sbatch for task submission. This is the most common way to let users write tasks as scripts for submission. But in fact, Slurm provides a variety of ways to submit tasks. The most common problem with using "sbatch" is that there is a problem with a line in the script. You must modify the script repeatedly to run smoothly. This is very bad for testing. Convenience, or the content to be executed needs to interact with the standout to be able to run. It is better to use "srun" and "salloc", which will be introduced separately.
### 4-6-1. salloc
Salloc is literally an abbreviation for "slurm allocate". Before explaining salloc, let's review the previous definitions of tasks and task steps:
• Job: In the traditional sense, a task is to run a script or program, but in the case of Slurm, a task is a resource application and allocation for a user at a specific time, allowing the user to run an arithmetic task.
• Job Step: Slrum has the concept of task steps, which can be understood as subtasks. This concept allows users to split computing resources into different subtasks within a task.
Whether it's sbatch, srun, or salloc, it's essentially a way to apply for resources to the Slurm controller to run a particular handler. The three parameters are the same for the resource when it is submitted, for example:
<div style="background-color:black;color:white;padding:20px;">
$ salloc -N 2 -n 2 -p SlurmDefault
Salloc: Granted job allocation 3002
</div>
If the current resource is sufficient, it will be displayed that the resource has been allocated (above: salloc: Granted job allocation 3002). The environment in which the user is present is the shell mode of the resource environment that has been allocated. This new environment has been based on the parameters of the allocated resource. The relevant environment is set, and the detailed information can be viewed through "env", and the output can be similar.
<div style="background-color:black;color:white;padding:20px;">
SLURM_NODELIST=gn1229.twcc.ai, gn1230.twcc.ai
LMOD_FAMILY_COMPILER_VERSION=7.3.0
SLURM_JOB_NAME=bash
MANPATH=/opt/ohpc/.../usr/share/man
HOSTNAME=un-ln01
_ModuleTable003_=PSJh...9wdWIvbW9kdWxlZmlsZXMiLH0=
SLURM_NODE_ALIASES=(null)
SHELL=/bin/bash
TERM=xterm-256color
SLURM_JOB_QOS=normal
HISTSIZE=1000
SSH_CLIENT=122.146.91.184 10045 22
LMOD_PKG=/opt/ohpc/admin/lmod/lmod
LMOD_VERSION=7.7.14
SSH_TTY=/dev/pts/0
__LMOD_REF_COUNT_LOADEDMODULES=autotools:1;prun/1.2:1;gnu7/7.3.0:1;openmpi3/3.1.0:1;ohpc:1
SLURM_NNODES=2
USER=yiching709
LS_COLORS=rs=0....axa=38;5;45:*.oga=38;5;45:*.spx=38;5;45:*.xspf=38;5;45:
LD_LIBRARY_PATH=/usr/local/cuda-9.0/lib64
SLURM_JOBID=3003
__LMOD_REF_COUNT__LMFILES_=/opt/ohpc/.../modulefiles/ohpc:1
SLURM_NTASKS=2
LMOD_PREPEND_BLOCK=normal
LMOD_FAMILY_MPI_VERSION=3.1.0
SLURM_TASKS_PER_NODE=1(x2)
PATH=/usr/local/cuda-9.0/bin.../usr/sbin:/usr/bin
MAIL=/var/spool/mail/user_account
_ModuleTable001_=X01vZH...udTcvNy4z
SLURM_JOB_ID=3003
LMOD_SETTARG_CMD=:
PWD=/home/user_account
_LMFILES_=/opt/ohpc/.../modulefiles/ohpc
LANG=en_US.UTF-8
MODULEPATH=/opt/ohpc/... /pub/modulefiles
LOADEDMODULES=autotools:prun/1.2:gnu7/7.3.0:openmpi3/3.1.0:ohpc
_ModuleTable_Sz_=3
SLURM_SUBMIT_DIR=/fs02/yiching709
SLURM_NPROCS=2
LMOD_CMD=/opt/ohpc/admin/lmod/lmod/libexec/lmod
HISTCONTROL=ignoredups
SLURM_JOB_NODELIST=gn1229.twcc.ai, gn1230.twcc.ai
HOME=/home/user_account
SHLVL=2
__LMOD_REF_COUNT_PATH=/opt/ohpc/.../ibutils/bin:1
SLURM_CLUSTER_NAME=default
SLURM_JOB_CPUS_PER_NODE=1(x2)
MPI_DIR=/opt/ohpc/pub/mpi/openmpi3-gnu7/3.1.0
_ModuleTable002_=LjAiL...YXR1cyJd
SLURM_SUBMIT_HOST=un-ln01
SHOST=un-ln01
__LMOD_REF_COUNT_INCLUDE=/opt/ohpc/pub/compiler/gcc/7.3.0/include:1
SLURM_JOB_PARTITION=SlurmDefault
BASH_ENV=/opt/ohpc/admin/lmod/lmod/init/bash
LOGNAME=user_name
SLURM_JOB_ACCOUNT=root
LC_CTYPE=UTF-8
SSH_CONNECTION=122.146.91.184 10045 172.28.31.1 22
SLURM_JOB_NUM_NODES=2
MODULESHOME=/opt/ohpc/admin/lmod/lmod
LESSOPEN=||/usr/bin/lesspipe.sh %s
LMOD_SETTARG_FULL_SUPPORT=no
__LMOD_REF_COUNT_LD_LIBRARY_PATH=/opt/ohpc/.../7.3.0/lib64:1
PKG_CONFIG_PATH=/opt/ohpc/pub/mpi/openmpi3-gnu7/3.1.0/lib/pkgconfig
LMOD_FULL_SETTARG_SUPPORT=no
LMOD_FAMILY_COMPILER=gnu7
__LMOD_REF_COUNT_PKG_CONFIG_PATH=/opt/ohpc/pub/mpi/openmpi3-gnu7/3.1.0/lib/pkgconfig:1
LMOD_DIR=/opt/ohpc/admin/lmod/lmod/libexec
__LMOD_REF_COUNT_MANPATH=/opt/ohpc/.../usr/share/man:1
SLURM_MEM_PER_NODE=771413
LMOD_COLORIZE=no
LMOD_FAMILY_MPI=openmpi3
BASH_FUNC_module()=() { eval $($LMOD_CMD bash "$@") && eval $(${LMOD_SETTARG_CMD:-:} -s sh)
}
BASH_FUNC_ml()=() { eval $($LMOD_DIR/ml_cmd "$@")
}
_=/usr/bin/env
</div>
As above, since the content we entered is "salloc -N 2 -n 2 -p SlurmDefault", we mean that we want two physical machines and two handlers, which can be viewed from "SLURM_NTASKS=2" and "SLURM_JOB_NUM_NODES=2" To the corresponding information. However, the shell environment used by salloc cannot manually change environment variables, so you should decide which resources to use before using them. In the shell, you can use the "srun" of the next section to submit the task directly. According to this setting, there will be 2 handlers, so it will be executed twice automatically:
<div style="background-color:black;color:white;padding:20px;">
$ srun date
Mon Dec 10 01:10:17 CST 2018
Mon Dec 10 01:10:17 CST 2018
</div>
To exit the current environment resource, just type "exit" and exit and release the resource. This is how saloc is used, as follows:
<div style="background-color:black;color:white;padding:20px;">
$ exit
Exit
Salloc: Relinquishing job allocation 3002
</div>
### 4-6-2. srun
In the process of describing salloc above, we used the srun instruction and saw that two date information was output at a time, proving that the instruction was executed twice at the same time. In fact, executing instructions directly through srun in a task is the way to use multiple resources in slurm. Srun can be used not only by salloc, but also directly in sbatch scripts. Running a srun is to execute a program, exit and release the resource after completion. Examples are as follows:
<div style="background-color:black;color:white;padding:20px;">
$ srun -N 2 -n 2 date
Mon Dec 10 01:32:00 CST 2018
Mon Dec 10 01:32:00 CST 2018
</div>
The above example is similar to salloc. After the execution of salloc, the resources are still not released, and after srun is executed, the resources are released for use by other tasks.
## 4-7. GPU resource scheduling
I have previously described how to specify resource parameters for a task, but only include the number of nodes, CPU usage, and memory usage. However, professional resource scheduling systems should support a variety of complex hardware resource management, such as GPU resources for this service. Slurm implements the management of common resources through a suite, allowing administrators to even develop a dedicated general management suite for use. This service also uses this suite for GPU resource control.
The common resource in Slurm is called GRES (Generic Resource). Slurm does not enable this function by default. However, this service is enabled to manage GPU resources, and the related settings for managing GPU resources are applied to each device. Slurm's management node and computing node to achieve GPU resource control. Users can apply for resources through the "--gres" parameter. Here is a script example to see how to use GPU resources.
<div style="background-color:black;color:white;padding:20px;">
#!/bin/bash
Date
Nvidia-smi
Hostname
Echo "done"
</div>
The "date" is the current time, and the "nvidia-smi" displays the information of the GPU. If there is a GPU in the allocated resource, the information about the GPU and the usage status can be seen through the command. The script finally displays the name of the running machine and prints the word "done".
We can use the following commands to dispatch tasks and specify the number of GPU resources used. "--gres" is the parameter for applying for universal resources, and "gpu" is the specific universal resource name set by the system. GPU resources, so the parameters are directly set to gpu. Finally, you can add a colon after the gpu, specify the amount of resources used, examples of instructions and output examples are as follows.
<div style="background-color:black;color:white;padding:20px;">
$ srun --gres=gpu:2 test.sh
</div>
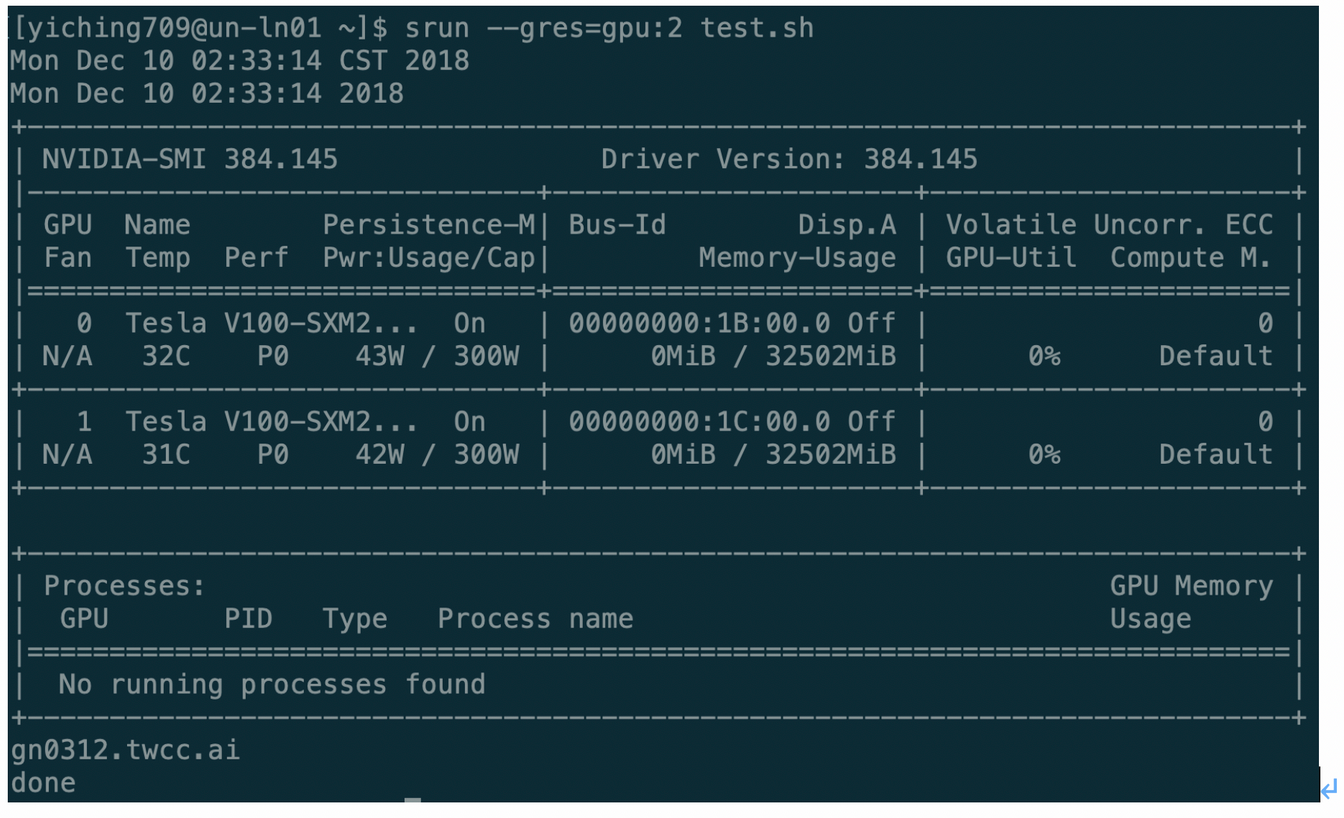
Since we only specify two GPU resources, the above example shows only the information of two GPU cards. The GPU card of Tesla V100 is used in this system. This example does not run a program that consumes GPU resources, so there are no GPU-related handlers.
# 5. Slurm instruction
The following describes the Slurm instructions and their associated options, which the user can follow. Detailed instructions can be found by adding "--help" to the back after logging in to see detailed usage and instructions.
## 5-1. sacct
This command is used to list the status of related tasks or task sets of an account, such as running, terminated, or completed, and is the most basic view task instruction.
The records related to scheduling tasks using Slurm are stored in the Log and the database in the system. Presets can be used to display tasks, task steps, related status, and exit codes through the sacct command. You can also specify what to output through the "--format" option. It should be noted that the information preset of the Slurm database is only saved and maintained in lowercase English letters. It is recommended that the user use lowercase input when specifying the task name and related parameters. Examples are as follows:
<div style="background-color:black;color:white;padding:20px;">
$ sacct
JobID JobName Partition Account AllocCPUS State ExitCode
---------- ---------- ------------- ---------- ------- -------- ---------------- --------
3121 bash SlurmDefa+ root 2 COMPLETED 0:0
</div>
## 5-2. salloc
Used to allocate resource allocations on the fly, usually used to allocate resources and generate a shell, then use the shell to execute the srun command to start and execute the task.
Use salloc to assign a Slurm task, which is a set of resources (operation nodes), usually containing definitions of constraints, such as how many handlers per machine. When salloc successfully obtains the resource configuration, it immediately executes the user-defined instruction. When the instruction is executed, the resource of the task is automatically released, or exit is released in the shell to release the resource.
The user-defined directive can be any program to be executed. Some commonly used commands are xterm or scripts containing srun instructions. If you do not specify an instruction to be executed, the service will default to the shell state. The example is as follows. It is specified to use two computing nodes. After using srun to display the host name, the node that is actually output is two different node names. After exiting, the current task ID is displayed correctly.
<div style="background-color:black;color:white;padding:20px;">
$ salloc -N2
Salloc: Granted job allocation 3135
$ srun hostname
Gn1229.twcc.ai
Gn1230.twcc.ai
$ exit
Exit
Salloc: Relinquishing job allocation 3135
</div>
## 5-3. sattach
Standard input, output, and error messages can be mounted and unloaded multiple times in the currently running task or task set. The sattach will be attached to a specific task step in the execution of the slurm task set. By attaching, the IO Streams will be made available to all the steps in the Slurm task. It is also suitable for parallel operation debugging tools such as TotalView. For example, we change the content of a script to multiple sruns, which are multiple task steps. After running, you can use sattach to browse the step status.
<div style="background-color:black;color:white;padding:20px;">
$ sacct
JobID JobName Partition Account AllocCPUS State ExitCode
---------- ---------- ------------- ---------- ------- -------- ---------------- --------
3139 test.sh SlurmDefa+ root 1 RUNNING 0:0
3139.0 date root 1 COMPLETED 0:0
3139.1 nvidia-smi root 1 FAILED 6:0
3139.2 sleep root 1 RUNNING 0:0
</div>
It can be seen from the above that task 3139 has multiple step numbers, and the status of the running number can be viewed through the sacct command. Enter "sacct 3139.2" directly here, but since this step is only sleep, no data is spit back to normal.
<div style="background-color:black;color:white;padding:20px;">
$ sacct 3139.2
</div>
## 5-4. sbatch
Used to submit a job script for later execution. This script usually contains one or more srun instructions for starting parallel tasks and is one of the most basic task run instructions. Sbatch will deliver a batch execution script to Slurm. The batch script can be specified by the file name in the command. If no file name is defined, sbatch will receive the command directly from standard input. In the batch script, the parameter may be specified before the instruction is executed by the method of pre-set "#SBATCH".
After the script is successfully passed to the Slumm controller, sbatch is assigned a Slurm task ID and exits immediately. At this point, the batch script does not get the resources immediately, and usually waits for the required resources in the task queue. The batch script executed by sbatch, the default standard output and the standard error preset will be imported into the file name of the format "slurm-<job_id>.out", where <job_id> is the ID number of the task, the file It will be generated at the first node associated with this task. In the case of this service, it will directly generate the path to execute the instruction on the login node. Examples are as follows:
<div style="background-color:black;color:white;padding:20px;">
$ sbatch test.sh
Submitted batch job 3139
$ ls
Slurm-3139.out test.sh
</div>
## 5-5. sbcast
It can be used to transfer files from a local hard drive to a node hard drive that is assigned tasks, providing better performance on a small compute node with a small hard disk space or relative to a shared file system. However, this service has provided HFS for users to transfer related files. Therefore, it is recommended to use the "/fs01" or "/fs02" two HFS directories instead of sbcast.
## 5-6. scancel
Used to cancel a task or set of tasks that are waiting, or running, or to send any signal to all processes related to the running task or task set. Scancel is used to signal or cancel a specific task, task array, or task step. A set of any number of tasks or task steps can be filtered out by a specified feature, or a blank key can be used to distinguish the ID of a complete sequence of tasks or task steps. If the task array has a defined task ID, only the task and the subtask are deleted. Otherwise, if there is no definition, all related tasks will be deleted.
When a heterogeneous task is in a pending state, only the entire task can be deleted, and the subtasks cannot be cancelled individually. If there is a separate deletion request, the system will report an error. A separate subtask can be cancelled when the task begins execution. The task or task step can be deleted by the owner of the task or the highest authority (root). If an unauthenticated user wants to transmit a signal, an error message will be generated. The scancel example is as follows, only the specific task steps are removed:
<div style="background-color:black;color:white;padding:20px;">
$ sbatch test.sh
Submitted batch job 3141
$ sacct
JobID JobName Partition Account AllocCPUS State ExitCode
---------- ---------- ------------- ---------- ------- -------- ------------- --------
3141 test.sh SlurmDefa+ root 1 RUNNING 0:0
3141.0 date root 1 COMPLETED 0:0
3141.1 nvidia-smi root 1 FAILED 6:0
3141.2 sleep root 1 RUNNING 0:0
$ scancel 3141.2
$ sacct
JobID JobName Partition Account AllocCPUS State ExitCode
---------- ---------- ------------- ---------- ------- -------- ------------- --------
3141 test.sh SlurmDefa+ root 1 COMPLETED 0:0
3141.batch batch root 1 COMPLETED 0:0
3141.0 date root 1 COMPLETED 0:0
3141.1 nvidia-smi root 1 FAILED 6:0
3141.2 sleep root 1 CANCELLED+ 0:9
3141.3 hostname root 1 COMPLETED 0:0
</div>
## 5-7. scontrol
Scontrol is a management tool for viewing and/or modifying the Slurm state. Please note that many scontrol commands can only be executed as the root user, so only the State Grid Center administrators can use them. Scontrol is used to view and edit Slurm's settings, including tasks, task steps, nodes, partitions, and reserved resources and system settings. Most of the instructions can only be executed by the highest authority administrator root. If an unauthenticated user uses this command, an error message will be generated.
If the executed instruction is not defined on the command line, it will enter interactive mode and wait for input until it exits. All instructions are case-insensitive, but the node name, partition name, and reserved name are case-sensitive. The modified Slurm configuration file can be written to the file using the "scontrol write config" command. The file name will be "slurm.conf.<datetime>" in the same directory as slurm.conf, where datetime indicates the write time and the The directory must be set to write-ready permissions in advance. Usually the average user will use the "show <ENTITY> <ID>" method to view the status of a specific item. For example, the following example uses scontrol to display the status of a specific task:
<div style="background-color:black;color:white;padding:20px;">
$ sbatch test.sh
Submitted batch job 3144
$ scontrol show job 3144
JobId=3144 JobName=test.sh
UserId=yiching709(12504) GroupId=TRI1072327(18712) MCS_label=N/A
Priority=4294899365 Nice=0 Account=root QOS=normal
JobState=RUNNING Reason=None Dependency=(null)
Requeue=1 Restarts=0 BatchFlag=1 Reboot=0 ExitCode=0:0
RunTime=00:00:03 TimeLimit=1-00:00:00 TimeMin=N/A
SubmitTime=2018-12-15T18:38:40 EligibleTime=2018-12-15T18:38:40
StartTime=2018-12-15T18:38:40 EndTime=2018-12-16T18:38:40 Deadline=N/A
PreemptTime=None SuspendTime=None SecsPreSuspend=0
LastSchedEval=2018-12-15T18:38:40
Partition=SlurmDefault AllocNode:Sid=un-ln01:25095
ReqNodeList=(null) ExcNodeList=(null)
NodeList=gn0512.twcc.ai
BatchHost=gn0512.twcc.ai
NumNodes=1 NumCPUs=1 NumTasks=1 CPUs/Task=1 ReqB:S:C:T=0:0:*:*
TRES=cpu=1, mem=771413M, node=1, billing=1
Socks/Node=* NtasksPerN:B :S:C=0:0:*:* CoreSpec=*
MinCPUsNode=1 MinMemoryNode=771413M MinTmpDiskNode=0
Features=(null) DelayBoot=00:00:00
Gres=(null) Reservation=(null)
OverSubscribe=OK Contiguous=0 Licenses=(null) Network=(null)
Command=/fs02/yiching709/test.sh
WorkDir=/fs02/yiching709
StdErr=/fs02/yiching709/slurm-3144.out
StdIn=/dev/null
StdOut=/fs02/yiching709/slurm-3144.out
Power=
</div>
## 5-8. sinfo
The sinfo information contains the status of the partitions and nodes managed by Slurm. sinfo has a variety of filtering, sorting, and formatting options. It is also often used to test whether the slurm command can be used normally. For example, the Slurm version information can be confirmed by "sinfo -V".
<div style="background-color:black;color:white;padding:20px;">
$ sinfo -V
Slurm 17.11.7
</div>
## 5-9. smap
Smap mainly displays the tasks, partitions, and status information of the nodes managed by Slurm in the form of images. Using smap will display some nodes and partitions that are rarely accessed, which is equivalent to using the "sinfo" or "squeue" commands. The result of the option "--all". The example after directly inputting "smap" is as follows. You can exit by simply pressing any key after entering this screen.

## 5-10. squeue
Squeue displays the status of the task or task set. It has a variety of filtering, sorting and formatting options. The preset is to display the running tasks in order of priority, and then display the tasks that are waiting in priority order, which is a common view of the task. Examples are as follows:
<div style="background-color:black;color:white;padding:20px;">
$ squeue
JOBID PARTITION NAME USER ST TIME NODES NODELIST(REASON)
2980 SlurmDefa test.sh u9833157 PD 0:00 3 (ReqNodeNotAvail, UnavailableNodes: gn0101.twcc.ai, gn0102.twcc.ai, gn0103.twcc.ai)
</div>
## 5-11. srun
Srun is used to submit tasks or as a single task in a submitted task set. Srun has a variety of options to specify resource requirements, including: minimum and maximum number of nodes, number of CPUs, whether specific nodes are used, and characteristics of specific nodes (such as memory size, hard disk space, certain required functions, etc.). Clusters managed by Slurm can perform parallel operations, running sequentially or in parallel on separate or shared nodes. The tasks that are run can include multi-step tasks and can work according to pre-allocated node resources. Examples are as follows:
<div style="background-color:black;color:white;padding:20px;">
$ srun date
Sat Dec 15 18:49:56 CST 2018
</div>
## 5-12. strigger
Strigger is used to set, get or view event triggers. Event triggers include events such as a node shutdown or a task approaching its time limit. These events may result in triggering the execution of arbitrary scripts, often used to alert system administrators to node failures, or to safely end a particular program in a specific manner when a task is running close to a limited time, typically using parameters such as nodelist or task ID. To pass to a specific program. This instruction is only available to users with administrative rights in the system. Please contact the system administrator if you want to use it.
# 6. Module Use
The following explains how to operate the basic usage of modules and related instructions, which the user can follow. For detailed instructions, you can see the detailed module usage and description after you log in and add "--help" to the back.
The module directive can help the user to set environmental variables that are appropriate for the HPC outside of the user's environment. In general, the user will have a system-defined module setting environment available.
## 6-1. module list
This directive is used to list all module information. Examples are as follows:
<div style="background-color:black;color:white;padding:20px;">
[qct@gn0101 ~]$ module list
Currently Loaded Modules:
1) intel/18.0.5.274 2) impi/2018.5.274
</div>
## 6-2. module avail
This directive is used to list all the module information that can be loaded. Examples are as follows:
<div style="background-color:black;color:white;padding:20px;">
[qct@gn0101 ~]$ module avail
------------------------ /opt/ohpc/pub/moduledeps/intel ---------------- --------
Impi/2018.5.274 (L) openmpi/1.10.7
Impi/2019.0.117 openmpi3/3.1.0
-------------------------- /opt/ohpc/pub/modulefiles ---------------- -----------
EasyBuild/3.6.1 hwloc/1.11.10 papi/5.6.0
Autotools intel/18.0.5.274 (L) pmix/2.1.1
Charliecloud/0.2.4 intel/19.0.0.117 prun/1.2
Cmake/3.11.1 llvm5/5.0.1 singularity/2.5.1
Gnu7/7.3.0 ohpc valgrind/3.13.0
Where:
D: Default Module
L: Module is loaded
Use "module spider" to find all possible modules.
Use "module keyword key1 key2 ..." to search for all possible modules matching any of the "keys".
</div>
## 6-3. module load package1 package2 ...
This instruction is used to load the specified module information. Examples are as follows:
Load the specified singularity/2.5.1 module command as follows:
[qct@gn0101 ~]$ module load singularity/2.5.1
The instructions to check the current module status are as follows:
<div style="background-color:black;color:white;padding:20px;">
[qct@gn0101 ~]$ module avail
------------------------ /opt/ohpc/pub/moduledeps/intel ---------------- --------
Impi/2018.5.274 (L) openmpi/1.10.7
Impi/2019.0.117 openmpi3/3.1.0
-------------------------- /opt/ohpc/pub/modulefiles ---------------- -----------
EasyBuild/3.6.1 hwloc/1.11.10 papi/5.6.0
Autotools intel/18.0.5.274 (L) pmix/2.1.1
Charliecloud/0.2.4 intel/19.0.0.117 prun/1.2
Cmake/3.11.1 llvm5/5.0.1 singularity/2.5.1 (L)
Gnu7/7.3.0 ohpc valgrind/3.13.0
Where:
D: Default Module
L: Module is loaded
Use "module spider" to find all possible modules.
Use "module keyword key1 key2 ..." to search for all possible modules matching any of the "keys".
</div>
Check result singularity/2.5.1 (L) has been loaded.
## 6-4. module unload package1 package2 ...
This command is used to unload the specified module information. Examples are as follows:
The instructions to check the current module status are as follows:
<div style="background-color:black;color:white;padding:20px;">
[qct@gn0101 ~]$ module avail
------------------------ /opt/ohpc/pub/moduledeps/intel ---------------- --------
Impi/2018.5.274 (L) openmpi/1.10.7
Impi/2019.0.117 openmpi3/3.1.0
-------------------------- /opt/ohpc/pub/modulefiles ---------------- -----------
EasyBuild/3.6.1 hwloc/1.11.10 papi/5.6.0
Autotools intel/18.0.5.274 (L) pmix/2.1.1
Charliecloud/0.2.4 intel/19.0.0.117 prun/1.2
Cmake/3.11.1 llvm5/5.0.1 singularity/2.5.1 (L)
Gnu7/7.3.0 ohpc valgrind/3.13.0
Where:
D: Default Module
L: Module is loaded
Use "module spider" to find all possible modules.
Use "module keyword key1 key2 ..." to search for all possible modules matching any of the "keys".
</div>
Singularity/2.5.1 module is the loaded state
Uninstall the specified singularity/2.5.1 module command as follows:
<div style="background-color:black;color:white;padding:20px;">
[qct@gn0101 ~]$ module unload singularity/2.5.1
</div>
The instructions to check the condition of the module after loading are as follows:
<div style="background-color:black;color:white;padding:20px;">
[qct@gn0101 ~]$ module avail
------------------------ /opt/ohpc/pub/moduledeps/intel ---------------- --------
Impi/2018.5.274 (L) openmpi/1.10.7
Impi/2019.0.117 openmpi3/3.1.0
-------------------------- /opt/ohpc/pub/modulefiles ---------------- -----------
EasyBuild/3.6.1 hwloc/1.11.10 papi/5.6.0
Autotools intel/18.0.5.274 (L) pmix/2.1.1
Charliecloud/0.2.4 intel/19.0.0.117 prun/1.2
Cmake/3.11.1 llvm5/5.0.1 singularity/2.5.1
Gnu7/7.3.0 ohpc valgrind/3.13.0
Where:
D: Default Module
L: Module is loaded
Use "module spider" to find all possible modules.
Use "module keyword key1 key2 ..." to search for all possible modules matching any of the "keys".
</div>
## 6-5. module swap package1 package2
This directive is used to replace the specified module settings, for example: replace package1 with package2. (Considered as module unload package1 && module load package2) Examples are as follows:
The instructions to check the current module status are as follows:
<div style="background-color:black;color:white;padding:20px;">
[qct@gn0101 ~]$ module avail
------------------------ /opt/ohpc/pub/moduledeps/intel ---------------- --------
Impi/2018.5.274 (L) openmpi/1.10.7
Impi/2019.0.117 openmpi3/3.1.0
-------------------------- /opt/ohpc/pub/modulefiles ---------------- -----------
EasyBuild/3.6.1 hwloc/1.11.10 papi/5.6.0
Autotools intel/18.0.5.274 (L) pmix/2.1.1
Charliecloud/0.2.4 intel/19.0.0.117 prun/1.2
Cmake/3.11.1 llvm5/5.0.1 singularity/2.5.1
Gnu7/7.3.0 ohpc valgrind/3.13.0
Where:
D: Default Module
L: Module is loaded
Use "module spider" to find all possible modules.
Use "module keyword key1 key2 ..." to search for all possible modules matching any of the "keys".
</div>
Currently loaded is intel/18.0.5.274 Compiler module
Replace the intel module with the gnu7 module command as follows:
<div style="background-color:black;color:white;padding:20px;">
[qct@gn0101 ~]$ module swap intel gnu7
Inactive Modules:
1) impi/2018.5.274
</div>
The instructions to check the status of the module after replacement are as follows:
<div style="background-color:black;color:white;padding:20px;">
[qct@gn0101 ~]$ module avail
------------------------ /opt/ohpc/pub/moduledeps/gnu7 ---------------- ---------
R/3.5.0 metis/5.1.0 openmpi3/3.1.0 scotch/6.0.4
Gsl/2.4 mpich/3.2.1 pdtoolkit/3.25 superlu/5.2.1
Hdf5/1.10.2 mvapich2/2.2 plasma/2.8.0
Impi/2019.0.117 ocr/1.0.1 py2-numpy/1.14.3
Likwid/4.3.2 openblas/0.2.20 py3-numpy/1.14.3
-------------------------- /opt/ohpc/pub/modulefiles ---------------- -----------
EasyBuild/3.6.1 hwloc/1.11.10 papi/5.6.0
Autotools intel/18.0.5.274 pmix/2.1.1
Charliecloud/0.2.4 intel/19.0.0.117 prun/1.2
Cmake/3.11.1 llvm5/5.0.1 singularity/2.5.1
Gnu7/7.3.0 (L) ohpc valgrind/3.13.0
Where:
D: Default Module
L: Module is loaded
Use "module spider" to find all possible modules.
Use "module keyword key1 key2 ..." to search for all possible modules matching any of the "keys".
</div>
The gnu7 module is currently loaded, and the intel module has been uninstalled.
## 6-6. module reset
This instruction is used to initially reset the module by unloading the currently loaded module and then loading the preset module settings set in the environment variable LMOD_SYSTEM_DEFAULT_MODULES. Examples are as follows:
Check the environment variable preset module list instructions as follows:
<div style="background-color:black;color:white;padding:20px;">
[qct@gn0101 ~]$ echo ${LMOD_SYSTEM_DEFAULT_MODULES}
Intel/18.0.5.274
</div>
The default is to use intel/18.05.274 module
The instructions to check the current module status are as follows:
<div style="background-color:black;color:white;padding:20px;">
[qct@gn0101 ~]$ module avail
------------------------ /opt/ohpc/pub/moduledeps/gnu7 ---------------- ---------
R/3.5.0 metis/5.1.0 openmpi3/3.1.0 scotch/6.0.4
Gsl/2.4 mpich/3.2.1 pdtoolkit/3.25 superlu/5.2.1
Hdf5/1.10.2 mvapich2/2.2 plasma/2.8.0
Impi/2019.0.117 ocr/1.0.1 py2-numpy/1.14.3
Likwid/4.3.2 openblas/0.2.20 py3-numpy/1.14.3
-------------------------- /opt/ohpc/pub/modulefiles ---------------- -----------
EasyBuild/3.6.1 hwloc/1.11.10 papi/5.6.0
Autotools intel/18.0.5.274 pmix/2.1.1
Charliecloud/0.2.4 intel/19.0.0.117 prun/1.2
Cmake/3.11.1 llvm5/5.0.1 singularity/2.5.1
Gnu7/7.3.0 (L) ohpc valgrind/3.13.0
Where:
D: Default Module
L: Module is loaded
Use "module spider" to find all possible modules.
Use "module keyword key1 key2 ..." to search for all possible modules matching any of the "keys".
</div>
Currently loaded is gnu7 module
The initial reset command to reply to module is as follows:
<div style="background-color:black;color:white;padding:20px;">
[qct@gn0101 ~]$ module reset
Resetting modules to system default
</div>
The instructions for checking the status of the module after the initial setting are as follows:
<div style="background-color:black;color:white;padding:20px;">
[qct@gn0101 ~]$ module avail
------------------------ /opt/ohpc/pub/moduledeps/intel ---------------- --------
Impi/2018.5.274 impi/2019.0.117 openmpi/1.10.7 openmpi3/3.1.0
-------------------------- /opt/ohpc/pub/modulefiles ---------------- -----------
EasyBuild/3.6.1 hwloc/1.11.10 papi/5.6.0
Autotools intel/18.0.5.274 (L) pmix/2.1.1
Charliecloud/0.2.4 intel/19.0.0.117 prun/1.2
Cmake/3.11.1 llvm5/5.0.1 singularity/2.5.1
Gnu7/7.3.0 ohpc valgrind/3.13.0
Where:
D: Default Module
L: Module is loaded
Use "module spider" to find all possible modules.
Use "module keyword key1 key2 ..." to search for all possible modules matching any of the "keys".
</div>
The module after the initial reset is the default intel/18.0.5.274 module loaded.
## 6-7. module restore
This command is used to initially reset the module, that is, uninstall the currently loaded module, and then load the user-defined module settings. If there is no user-defined module setting, the preset module setting set in the environment variable LMOD_SYSTEM_DEFAULT_MODULES is used. . [How users customize module settings] (https://lmod.readthedocs.io/en/latest/010_user.html#user-collections-label)
## 6-8. module help
<div style="background-color:black;color:white;padding:20px;">
[qct@gn0101 ~]$ module help
Usage: module [options] sub-command [args ...]
Options:
-h -? -H --help This help message
-s availStyle --style=availStyle Site controlled avail style: system (default: system)
--regression_testing Lmod regression testing
-D Program tracing written to stderr
--debug=dbglvl Program tracing written to stderr
--pin_versions=pinVersions When doing a restore use specified version, do not follow defaults
-d --default List default modules only when used with avail
-q --quiet Do not print out warnings
--expert Expert mode
-t --terse Write out in machine readable format for commands: list, avail, spider,
savelist
--initial_load loading Lmod for first time in a user shell
--latest Load latest (ignore default)
--ignore_cache Treat the cache file(s) as out-of-date
--novice Turn off expert and quiet flag
--raw Print modulefile in raw output when used with show
-w twidth --width=twidth Use this as max term width
-v --version Print version info and quit
-r --regexp use regular expression match
--gitversion Dump git version in a machine readable way and quit
--dumpversion Dump version in a machine readable way and quit
--check_syntax --checkSyntax Checking module command syntax: do not load
--config Report Lmod Configuration
--config_json Report Lmod Configuration in json format
--mt Report Module Table State
--timer report run times
--force force removal of a sticky module or save an empty collection
--redirect Send the output of list, avail, spider to stdout (not stderr)
--no_redirect Force output of list, avail and spider to stderr
--show_hidden Avail and spider will report hidden modules
--spider_timeout=timeout a timeout for spider
-T --trace
module [options] sub-command [args ...]
Help sub-commands:
------------------
help prints this message
help module [...] print help message from module(s)
Loading/Unloading sub-commands:
-------------------------------
load | add module [...] load module(s)
try-load | try-add module [...] Add module(s), do not complain if not found
del | unload module [...] Remove module(s), do not complain if not found
swap | sw | switch m1 m2 unload m1 and load m2
purge unload all modules
refresh reload aliases from current list of modules.
update reload all currently loaded modules.
Listing / Searching sub-commands:
---------------------------------
list List loaded modules
list s1 s2 ... List loaded modules that match the pattern
avail | av List available modules
avail | av string List available modules that contain "string".
spider List all possible modules
spider module List all possible version of that module file
spider string List all module that contain the "string".
spider name/version Detailed information about that version of the module.
whatis module Print whatis information about module
keyword | key string Search all name and whatis that contain "string".
Searching with Lmod:
--------------------
All searching (spider, list, avail, keyword) support regular expressions:
-r spider '^p' Finds all the modules that start with `p' or `P'
-r spider mpi Finds all modules that have "mpi" in their name.
-r spider 'mpi$ Finds all modules that end with "mpi" in their name.
Handling a collection of modules:
--------------------------------
save | s Save the current list of modules to a user defined "default" collection.
save | s name Save the current list of modules to "name" collection.
reset The same as "restore system"
restore | r Restore modules from the user's "default" or system default.
restore | r name Restore modules from "name" collection.
restore system Restore module state to system defaults.
savelist List of saved collections.
describe | mcc name Describe the contents of a module collection.
disable name Disable a collection.
Deprecated commands:
--------------------
getdefault [name] load name collection of modules or user's "default" if no name given.
===> Use "restore" instead <====
setdefault [name] Save current list of modules to name if given, otherwise save as the
default list for you the user.
===> Use "save" instead. <====
Miscellaneous sub-commands:
---------------------------
show modulefile show the commands in the module file.
use [-a] path Prepend or Append path to MODULEPATH.
unuse path remove path from MODULEPATH.
tablelist output list of active modules as a lua table.
Important Environment Variables:
--------------------------------
LMOD_COLORIZE If defined to be "YES" then Lmod prints properties and warning in color.
------------------------------------------------------------------------------------------------------------
Lmod Web Sites
Documentation: http://lmod.readthedocs.org
Github: https://github.com/TACC/Lmod
Sourceforge: https://lmod.sf.net
TACC Homepage: https://www.tacc.utexas.edu/research-development/tacc-projects/lmod
To report a bug please read http://lmod.readthedocs.io/en/latest/075_bug_reporting.html
------------------------------------------------------------------------------------------------------------
Modules based on Lua: Version 7.7.14 2017-11-16 16:23 -07:00
by Robert McLay mclay@tacc.utexas.edu
</div>
# 7. Execution example
The following example program shows how to compile and execute the program.
## 7-1. module Select
Clear all module load settings and view existing available module resources.
(modulefiles configuration may change at any time, please use module avail to view the latest configuration)
<div style="background-color:black;color:white;padding:20px;">
#Clean Module Setting
$ module purge
#Check Module Available Status
$ module avail
------------------------------------ /opt/ohpc/pub/modulefiles ------------------------------------
EasyBuild/3.6.1 compiler/llvm/5.0.1 nvidia/cuda/9.2.88
charliecloud/0.2.4 compiler/pgi/18.10 nvidia/cuda/10.0.130 (D)
compiler/gnu/4.8.5 (D) devel/autotools papi/5.6.0
compiler/gnu/7.3.0 devel/cmake/3.11.1 pmix/2.1.1
compiler/intel/19.0.1.144 devel/hwloc/1.11.10 prun/1.2
compiler/intel/2017 devel/valgrind/3.13.0 singularity/2.5.1
compiler/intel/2018 (D) nvidia/cuda/9.0.176
Where:
D: Default Module
Use "module spider" to find all possible modules.
Use "module keyword key1 key2 ..." to search for all possible modules matching any of the "keys".
</div>
Load the selected Module, here GNU7 and MVAPICH Module.
<div style="background-color:black;color:white;padding:20px;">
$ module purge
$ module load compiler/gnu/7.3.0 mvapich2/2.2
</div>
Check the load module status
<div style="background-color:black;color:white;padding:20px;">
$ module list
Currently Loaded Modules:
1)compiler/gnu/7.3.0 2) mvapich2/2.2
</div>
## 7-2. Compiler
Confirm the type of compiler currently loaded
<div style="background-color:black;color:white;padding:20px;">
$ which mpicc
/opt/ohpc/pub/mpi/mvapich2-gnu7/2.2/bin/mpicc
</div>
編譯程式
<div style="background-color:black;color:white;padding:20px;">
$ mpicc -o hello /opt/ohpc/pub/examples/mpi/hello.c
</div>
取得Slurm資源
<div style="background-color:black;color:white;padding:20px;">
$ salloc -N 4 -n 4 -p gtest
salloc: Granted job allocation 3718
</div>
編寫執行環境內容(可參考/opt/ohpc/pub/examples/slurm/job.mpi )
<div style="background-color:black;color:white;padding:20px;">
$ cat job.mpi
#!/bin/bash
#SBATCH -J test # Job name
#SBATCH -o job.%j.out # Name of stdout output file (%j expands to jobId)
#SBATCH -N 2 # Total number of nodes requested
#SBATCH -n 16 # Total number of mpi tasks requested
#SBATCH -t 01:30:00 # Run time (hh:mm:ss) - 1.5 hours
#Launch MPI-based executable
srun ./hello
</div>
執行程式
$ sbatch job.mpi
Submitted batch job 3718
查看執行輸出結果
<div style="background-color:black;color:white;padding:20px;">
$ cat job.3718.out
MPIR_Init_thread(514):
MPID_Init(370).......:
Hello, world (1 procs total)
--> Process # 0 of 1 is alive. -> gn0312.twcc.ai
Hello, world (1 procs total)
--> Process # 0 of 1 is alive. -> gn0312.twcc.ai
Hello, world (1 procs total)
--> Process # 0 of 1 is alive. -> gn0312.twcc.ai
Hello, world (1 procs total)
--> Process # 0 of 1 is alive. -> gn0312.twcc.ai
Hello, world (1 procs total)
--> Process # 0 of 1 is alive. -> gn0312.twcc.ai
Hello, world (1 procs total)
--> Process # 0 of 1 is alive. -> gn0312.twcc.ai
Hello, world (1 procs total)
--> Process # 0 of 1 is alive. -> gn0312.twcc.ai
Hello, world (1 procs total)
--> Process # 0 of 1 is alive. -> gn0312.twcc.ai
Hello, world (1 procs total)
--> Process # 0 of 1 is alive. -> gn0312.twcc.ai
Hello, world (1 procs total)
--> Process # 0 of 1 is alive. -> gn0312.twcc.ai
Hello, world (1 procs total)
--> Process # 0 of 1 is alive. -> gn0312.twcc.ai
Hello, world (1 procs total)
--> Process # 0 of 1 is alive. -> gn0312.twcc.ai
Hello, world (1 procs total)
--> Process # 0 of 1 is alive. -> gn0312.twcc.ai
Hello, world (1 procs total)
--> Process # 0 of 1 is alive. -> gn0312.twcc.ai
Hello, world (1 procs total)
--> Process # 0 of 1 is alive. -> gn0312.twcc.ai
</div>
GPU測試程式編輯
<div style="background-color:black;color:white;padding:20px;">
#gpu.sh for GPU Resource Test
$ cat gpu.sh
#!/bin/bash
#SBATCH --ntasks 1 # number of tasks
#SBATCH -p SlurmDefault # queue
#SBATCH --mem 1024 # memory pool per process
#SBATCH -o slurm.%N.%j.out # STDOUT
#SBATCH -t 0:05:00 # time (D-HH:MM)
#SBATCH --gres=gpu:8
nvidia-smi
</div>
執行GPU測試程式
<div style="background-color:black;color:white;padding:20px;">
$ sbatch gpu.sh
Submitted batch job 3732
</div>
查看執行輸出結果
<div style="background-color:black;color:white;padding:20px;">
$ cat slurm.gn0103.3732.out
Thu Dec 27 09:16:52 2018
+-----------------------------------------------------------------------------+
| NVIDIA-SMI 410.79 Driver Version: 410.79 CUDA Version: 10.0 |
|-------------------------------+----------------------+----------------------+
| GPU Name Persistence-M| Bus-Id Disp.A | Volatile Uncorr. ECC |
| Fan Temp Perf Pwr:Usage/Cap| Memory-Usage | GPU-Util Compute M. |
|=============================== + ====================== + ======================|
| 0 Tesla V100-SXM2... On | 00000000:1B:00.0 Off | 0 |
| N/A 34C P0 43W / 300W | 0MiB / 32480MiB | 0% Default |
+-------------------------------+----------------------+----------------------+
| 1 Tesla V100-SXM2... On | 00000000:1C:00.0 Off | 0 |
| N/A 31C P0 43W / 300W | 0MiB / 32480MiB | 0% Default |
+-------------------------------+----------------------+----------------------+
| 2 Tesla V100-SXM2... On | 00000000:3D:00.0 Off | 0 |
| N/A 30C P0 44W / 300W | 0MiB / 32480MiB | 0% Default |
+-------------------------------+----------------------+----------------------+
| 3 Tesla V100-SXM2... On | 00000000:3E:00.0 Off | 0 |
| N/A 33C P0 44W / 300W | 0MiB / 32480MiB | 0% Default |
+-------------------------------+----------------------+----------------------+
| 4 Tesla V100-SXM2... On | 00000000:B1:00.0 Off | 0 |
| N/A 31C P0 48W / 300W | 0MiB / 32480MiB | 0% Default |
+-------------------------------+----------------------+----------------------+
| 5 Tesla V100-SXM2... On | 00000000:B2:00.0 Off | 0 |
| N/A 34C P0 42W / 300W | 0MiB / 32480MiB | 0% Default |
+-------------------------------+----------------------+----------------------+
| 6 Tesla V100-SXM2... On | 00000000:DB:00.0 Off | 0 |
| N/A 33C P0 44W / 300W | 0MiB / 32480MiB | 0% Default |
+-------------------------------+----------------------+----------------------+
| 7 Tesla V100-SXM2... On | 00000000:DC:00.0 Off | 0 |
| N/A 31C P0 43W / 300W | 0MiB / 32480MiB | 0% Default |
+-------------------------------+----------------------+----------------------+
+-----------------------------------------------------------------------------+
| Processes: GPU Memory |
| GPU PID Type Process name Usage |
|=============================================================================|
| No running processes found |
+-----------------------------------------------------------------------------+
</div>
## 7-3. 其他 MPI範例
submit jobs with srun
| MPI version| Module load|
| -------- | -------- |
| intel mpi| compiler/intel/2018|
| mvapich| compiler/gnu/7.3.0 mvapich2/2.2|
| mpich | compiler/gnu/7.3.0 mpich/3.2.1|
| openmpi| compiler/gnu/7.3.0 openmpi3/3.1.0|
step by step example
<div style="background-color:black;color:white;padding:20px;">
#compile
$ module purge
$ module load compiler/intel/2018
$ mpicc -o hello /opt/ohpc/pub/examples/mpi/hello.c
</div>
file name : srun_job.sh
<div style="background-color:black;color:white;padding:20px;">
#!/bin/bash
#SBATCH -A ENT107046 # Project Account
#SBATCH -J test # Job name
#SBATCH -o job.%j.out # Name of stdout output file (%j expands to jobId)
#SBATCH -N 4 # Total number of nodes requested
#SBATCH -n 16 # Total number of mpi tasks requested
#SBATCH -t 00:30:00 # Run time (hh:mm:ss) - 0.5 hours
#SBATCH -p gp2d # partition
module purge
module load compiler/intel/2018
srun ./hello
</div>
and submit it
<div style="background-color:black;color:white;padding:20px;">
$ sbatch srun_job.sh
</div>