---
title: 檔案資料傳輸 | zh
tags: Guide, TWNIA3, TW
GA:
---
{%hackmd @docsharedstyle/default %}
# 檔案資料傳輸
在使用資料傳輸節點之前需要進行 <b>SSH 公開金鑰認證</b>,以便日後建立自動化的工作流程作業時,可利用公鑰認證機制免除重複輸入密碼的不便。
以下依照不同的操作模式,進行 <b>SSH 金鑰認證</b>設定流程和軟體設定介紹,依個人操作習慣與實際環境擇一設定即可。
---
### 1. SSH 終端機模式 - 指令操作 (適用於 Windows MobaXterm local terminal/ UNIX / Linux / MacOS )
:::info
:::spoiler <b>Step 1. 產生公私鑰對 </b>
<!--- insert from "SSH Key Pair" --->
{%hackmd @TWCC-III-manual/rJLfzNe2_ %}
:::
:::info
:::spoiler <b>Step 2. 將 public key 傳送到 server 端</b>
#### - 鍵入 `ssh-copy-id` 將 public key 上傳至台灣杉三號 `home directory` 下的 `~/.ssh/authorized_keys`
- 開啟 <b>Terminal</b> 輸入 `ssh-copy-id -i /path/to/id_rsa.pub 主機帳號@twnia3.nchc.org.tw`
如:
```!
local_user@local_host % ssh-copy-id -i /Users/local_user/.ssh/id_rsa.pub xxx@twnia3.nchc.org.tw
/usr/bin/ssh-copy-id: INFO: Source of key(s) to be installed: "/Users/local_user/.ssh/id_rsa.pub"
/usr/bin/ssh-copy-id: INFO: attempting to log in with the new key(s), to filter out any that are already installed
/usr/bin/ssh-copy-id: INFO: 1 key(s) remain to be installed -- if you are prompted now it is to install the new keys
```
- 選擇要使用的OTP方式,然後輸入密碼,若無錯誤訊息,即上傳成功
```
(xxx@twnia3.nchc.org.tw) Please select the 2FA login method.
1. Mobile APP OTP
2. Mobile APP PUSH
3. Email OTP
Login method: 2
(xxx@twnia3.nchc.org.tw) Password:
```
<!---
:::warning
<i class="fa fa-lightbulb-o" aria-hidden="true"></i> 提醒:以下敘述不適用於台灣杉三號,登入節點將採用強制密碼 + OTP 登入驗證,資料傳輸節點使用 ssh public key 驗證。
</div>
```!
Now try logging into the machine, with: "ssh 'xxx@twnia3.nchc.org.tw'"
and check to make sure that only the key(s) you wanted were added.
```
--->
<!---
#### Step 2 .在資料傳輸節點使用 <b>sftp</b> 測試是否生效
- 請開啟 <b>Terminal</b> 輸入 `sftp xxx@t3-x1.nchc.org.tw`
```!
local_user@local_host % sftp xxx@t3-x1.nchc.org.tw
```
- 初次登入時會出現以下畫面,請輸入 `yes`
```!
The authenticity of host 't3-x1.nchc.org.tw (203.145.216.61)' can't be established.
ECDSA key fingerprint is SHA256:niCJVlimkuCIMYcvIn5Nz3wNQNOhZ3QCCjC8RDU0JcA.
Are you sure you want to continue connecting (yes/no/[fingerprint])? yes
```
- 若ssh key有設定密碼保護,請輸入key的密碼。出現 `sftp>` 即表示登入成功。
```!
Warning: Permanently added 't3-x1.nchc.org.tw,203.145.216.61' (ECDSA) to the list of known hosts.
Enter passphrase for key '/Users/local_user/.ssh/id_rsa':
Connected to t3-x1.nchc.org.tw.
sftp>
```
- 測試完畢,可輸入 `quit` 離開。
```
sftp> quit
```
--->
:::
:::info
:::spoiler <b>Step 3. SSH 指令傳輸 - 可使用 <b>sftp</b>、<b>scp</b> 和 <b>rsync</b> 三種常見指令</b>
<br>
<!--- insert from "SSH 指令傳輸提醒" --->
{%hackmd @TWCC-III-manual/BkJiK4g3_ %}
### 1. 使用 sftp
- 請輸入 `sftp 用戶帳號@t3-x1.nchc.org.tw`
```!
local_user@local_host ~% sftp xxx@t3-x1.nchc.org.tw
```
- 初次登入時會出現以下畫面,請輸入 `yes`
```!
The authenticity of host 't3-x1.nchc.org.tw (203.145.216.61)' can't be established.
ECDSA key fingerprint is SHA256:niCJVlimkuCIMYcvIn5Nz3wNQNOhZ3QCCjC8RDU0JcA.
Are you sure you want to continue connecting (yes/no/[fingerprint])? yes
```
- 若 ssh key 有設定密碼保護,請輸入 key 的密碼。出現 `sftp>` 即表示登入成功。
```!
Warning: Permanently added 't3-x1.nchc.org.tw,203.145.216.61' (ECDSA) to the list of known hosts.
Enter passphrase for key '/Users/local_user/.ssh/id_rsa':
Connected to t3-x1.nchc.org.tw.
sftp>
```
- 使用 `pwd` 指令顯示目前所在目錄
```
sftp> pwd
Remote working directory: /home/xxx
```
- 使用 `lls` 指令列出本地端目錄
```
sftp> lls
Desktop Documents Downloads Music Pictures Public Templates Videos intel-hello
```
- 使用 `ls` 指令列出遠端主機目錄
```
sftp> ls
delight.sh hello_sftp.sh hello_world.sh sftp_download.sh sh_direc download_sftp_direct
```
- 可輸入 `quit` 離開。
```
sftp> quit
```
- 使用 `put 檔案名稱 遠端主機任意指定路徑` 指令上傳檔案
```
sftp> put hello_sftp.sh /home/xxx/Documents
Uploading hello_sftp.sh to /home/xxx/Documents/hello_sftp.sh
hello_sftp.sh 100% 35 6.4KB/s 00:00
```
- 使用 `put -r 檔案名稱 遠端主機任意指定路徑` 指令上傳目錄
```
sftp> put -r sftp_upload_direct /home/xxx/Documents/
Uploading sftp_upload_direct/ to /home/xxx/Documents/sftp_upload_direct
Entering sftp_upload_direct/
sftp_upload_direct/upload_sftp.txt 100% 41 7.2KB/s 00:00
```
- 使用 `get 遠端主機路徑/檔案名稱 本地端任意指定下載位置` 指令下載檔案( **" . " --> 目前位置**)
```
sftp> get /home/xxx/Documents/sftp_download.sh .
Fetching /home/xxx/Documents/sftp_download.sh to ./sftp_download.sh
/home/xxx/Documents/sftp_download.sh 100% 58 6.2KB/s 00:00
```
- 使用 `get -r 遠端主機路徑/檔案名稱 本地端任意指定下載位置` 指令下載目錄( **" . " --> 目前位置**)
```
sftp> get -r /home/xxx/Documents/download_sftp_direct/ .
Fetching /home/xxx/Documents/download_sftp_direct/ to ./download_sftp_direct
Retrieving /home/xxx/Documents/download_sftp_direct
/home/xxx/Documents/download_sftp_direct/sftp_two 100% 18 1.9KB/s 00:00
/home/xxx/Documents/download_sftp_direct/sftp_one 100% 19 2.1KB/s 00:00
```
- 使用 `help` 指令查看更多用法
---
### 2. 使用 scp
- 使用 `scp 檔案名稱 主機帳號@t3-x1.nchc.org.tw:任意指定路徑` 指令將檔案上傳(<b>" ./* " --> 所有 .sh 的檔案</b>)
```!
local_user@local_host ~% scp ./*.sh xxx@t3-x1.nchc.org.tw:~
Enter passphrase for key '/Users/local_user/.ssh/id_rsa':
hi_name.sh 100% 91 6.2KB/s 00:00
intel.sh 100% 637 46.4KB/s 00:00
time_call.sh 100% 74 6.7KB/s 00:00
```
- 使用 `scp -r ./目錄名稱 主機帳號@t3-x1.nchc.org.tw:任意指定路徑` 指令將目錄上傳
```
local_user@local_host ~% scp -r ./sh_direc xxx@t3-x1.nchc.org.tw:/home/xxx/Documents/
Enter passphrase for key '/Users/local_user/.ssh/id_rsa':
hi_name.sh 100% 91 14.0KB/s 00:00
intel.sh 100% 637 135.8KB/s 00:00
time_call.sh 100% 74 17.0KB/s 00:00
```
- 使用 `scp 主機帳號@t3-x1.nchc.org.tw:/檔案路徑/檔案名稱 本地端任意指定位置` 指令下載檔案( **" . " --> 目前位置**)
```
local_user@local_host ~% scp uxxx@t3-x1.nchc.org.tw:/home/uxxx/Desktop/delight.sh .
Enter passphrase for key '/Users/local_user/.ssh/id_rsa':
delight.sh 100% 31 3.1KB/s 00:00
```
- 使用 `scp -r 主機帳號@t3-x1.nchc.org.tw:/目錄路徑/目錄名稱 本地端任意指定位置` 指令下載目錄( **" . " --> 目前位置**)
```
local_user@local_host ~% scp -r xxx@t3-x1.nchc.org.tw:/home/uxxx/Documents/hi_remote_direct .
Enter passphrase for key '/Users/local_user/.ssh/id_rsa':
remote_one 100% 30 2.8KB/s 00:00
remote_two 100% 28 5.4KB/s 00:00
```
### 3. 使用 rsync
- 使用 `rsync -azvh 檔案名稱 主機帳號@t3-x1.nchc.org.tw:/任意指定位置路徑` 指令將檔案上傳
```
local_user@local_host ~% rsync -azvh local_rsync.sh xxx@t3-x1.nchc.org.tw:/home/xxx/Documents/
Enter passphrase for key '/Users/local_user/.ssh/id_rsa':
building file list ... done
local_rsync.sh
sent 162 bytes received 42 bytes 17.74 bytes/sec
total size is 32 speedup is 0.16
```
- 使用 `rsync -azrvh ./目錄名稱 主機帳號@t3-x1.nchc.org.tw:/任意指定位置路徑` 指令將目錄上傳
```
local_user@local_host ~% rsync -azrvh ./rsync_compres_local xxx@t3-x1.nchc.org.tw:/home/xxx/Documents/
Enter passphrase for key '/Users/local_user/.ssh/id_rsa':
building file list ... done
rsync_compres_local/
rsync_compres_local/delight.sh
rsync_compres_local/hello_sftp.sh
rsync_compres_local/hello_world.sh
rsync_compres_local/sftp_download.sh
sent 525 bytes received 114 bytes 28.40 bytes/sec
total size is 160 speedup is 0.25
```
- 使用 `rsync -azvh 主機帳號@t3-x1.nchc.org.tw:/檔案路徑/檔案名稱 本地端任意指定下載位置` 指令將檔案下載( **" . " --> 目前位置**)
```
local_user@local_host ~% rsync -azvh xxx@t3-x1.nchc.org.tw:/home/xxx/Documents/rsync_compres_remote/ .
Enter passphrase for key '/Users/local_user/.ssh/id_rsa':
receiving file list ... done
./
rsync_remote.sh
sent 44 bytes received 182 bytes 16.74 bytes/sec
total size is 20 speedup is 0.09
```
- 使用 `rsync -azrvh 主機帳號@t3-x1.nchc.org.tw:/目錄路徑/目錄名稱 本地端任意指定下載位置` 指令將目錄下載( **" . " --> 目前位置**)
```
local_user@local_host ~% rsync -azrvh xxx@t3-x1.nchc.org.tw:/home/xxx/Documents/rsync_compres_remote .
Enter passphrase for key '/Users/local_user/.ssh/id_rsa':
receiving file list ... done
rsync_compres_remote/
rsync_compres_remote/rsync_remote.sh
sent 44 bytes received 203 bytes 32.93 bytes/sec
total size is 20 speedup is 0.08
```
:::
---
### 2. WinSCP - <b>圖形介面</b>操作 (適用於 Windnows 系統)
:::info
:::spoiler <b>Step 1. 產生公私鑰對 - PuTTYGEN</b>
<!--- insert from "PuTTYGEN" --->
{%hackmd @TWCC-III-manual/rJPb6xJhu %}
:::
:::info
:::spoiler <b>Step 2. 將 public key 存入 Taiwna3 主機端</b>
#### - 手動加到 `~/.ssh/authorized_keys`
<!--- "使用 puttygen 產生的 Key 不會在這個路徑生成"
#### 1. 在產生key pair之後查看 public key 內容並複製
- 請開啟 <b>Terminal</b> 輸入 `cat /Users/用戶帳號/.ssh/id_rsa.pub`,即可取得 `id_rsa.pub` 完整資訊。
```!
local_user@local_host ~% cat /Users/local_user/.ssh/id_rsa.pub
ssh-rsa AAAAB3NzaC1yc2EAAAADAQABAAABgQDLcQ7uVYhDDu2Rf8kTFIiZdXhDcAs+DdGJoKAAE2Bra6OVOkOD1qYF5TYH/Rr1I9EwpHPrPVLRvlgY4o4STw46uxj1XhO15ZY8Nlo4gWVHwyWnlCNAM7JF95xcQUbxCNB3EFdI8S0rFw9R8fgREzG1PG3rDyMHX0SdggZf5hnnqR0UCxViRwgPIHaM2LVx9HqBriD2ZqcjR19lFcGN3htNjChtmBdek0300kI364uAtaaadJLrX4gA4K2WftSwwm00A/UFksuS70Om+dt4KVtfixFgfb38OM5kG/7OJC5OsjxCaO6vHNk68bWC1ItTnPKshdoSARByig5txaGe1bnFD3Xlj2v0K0jY5BBzOODHJXjsmbMCL5WN+70+q8DCpGkQ0Zjsyn5BBrR/1QsPtQsyX7VB#####&&&&&*****%%%%^^^^^= xxx@HYdeMacBook-Air.local
```
--->
#### 1. 連線到台灣杉三號的登入節點
- 可開啟 <b>命令列視窗(鍵盤上按Win鍵+R鍵,輸入cmd,如下圖,按下確定),之後於提示符號輸入 `ssh $user_account@twnia3.nchc.org.tw`,依提示選擇OTP種類與輸入密碼(<font color="#FF0000"><b>$user_account 為使用者帳號,請依實際帳號名稱輸入,勿照抄!</b></font>)或使用putty等其他ssh client登入系統。

```
Microsoft Windows [版本 10.0.22631.4112]
(c) Microsoft Corporation. 著作權所有,並保留一切權利。
C:\Users\Demo>ssh demo_user@twnia3.nchc.org.tw
The authenticity of host 'twnia3.nchc.org.tw (203.145.216.55)' can't be established.
ED25519 key fingerprint is SHA256:XaT/mixQl2KRuCHp7hT9jxEprwCgENtwATXbjSHoXT0.
This key is not known by any other names
Are you sure you want to continue connecting (yes/no/[fingerprint])? yes
Warning: Permanently added 'twnia3.nchc.org.tw' (ED25519) to the list of known hosts.
(demo_user@twnia3.nchc.org.tw) Please select the 2FA login method.
1. Mobile APP OTP
2. Mobile APP PUSH
3. Email OTP
Login method: 2
(demo_user@twnia3.nchc.org.tw) Password:
Please check your push token.
[PASS] The push verification succeeded.
.....
```
#### 2. 編輯 `~/.ssh/authorized_keys`,將 public key 內容貼上後存檔,以下為vi/vim範例,請使用您熟悉的文字編輯器即可。
- 輸入 `cd .ssh/` 進入目錄後再輸入 `vim authorized_keys` 開啟 <b>Vim</b>
- 按 `i` 進入編輯模式開始插入編輯,將複製的 public key 內容貼上
```!
[xxx@lgn301 ~]$ cd .ssh/
[xxx@lgn301 .ssh]$ ls
authorized_keys id_dsa id_dsa.pub id_ed25519 id_ed25519.pub known_hosts
[xxxlgn301 .ssh]$ vim authorized_keys
```
- 結束編輯時,按 `esc` 跳到命令模式,鍵入 `:wq` 接著按 `enter` 完成存檔。
#### 3. 檢查檔案屬性
- `authorized_keys` 檔案屬性應該只允許 owner 可以 `rw`,請輸入 `ls -l ~/.ssh/authorized_keys`
```!
[xxx@lgn301 .ssh]$ ls -l ~/.ssh/authorized_keys
-rw------- 1 xxx TRI1101195 1164 6月 20 15:24 /home/xxx/.ssh/authorized_keys
```
- 若與上述不符合,請檢查上一層的 `~/.ssh`,也應該只有owner可以 `rwx`。請輸入 `ls -ld ~/.ssh`
```
[xxx@lgn301 .ssh]$ ls -ld ~/.ssh
drwx------ 2 xxx TRI1101195 4096 6月 20 15:24 /home/xxx/.ssh
```
- 若不確定屬性是否正確,請輸入 `chmod 700 ~/.ssh` 和 `chmod 600 ~/.ssh/authorized_keys`
```!
[xxx@lgn301 .ssh]$ chmod 700 ~/.ssh
[xxx@lgn301 .ssh]$ chmod 600 ~/.ssh/authorized_keys
```
<!---
#### 4. 回到本地端測試是否可以 sftp / scp 到資料傳輸節點
- 將 public key 存入 Taiwna3 主機端後,可在本地端輸入 `scp` 指令進行測試。本例將所有.sh檔案 `./*.sh` 上傳至`@t3-x1.nchc.org.tw`
- 輸入 `passphrase` 後若自動完成上傳,表示 public key 已成功存入主機端
```!
local_user@local_host ~% scp ./*.sh xxx@t3-x1.nchc.org.tw:~
Enter passphrase for key '/Users/local_user/.ssh/id_rsa':
hi_name.sh 100% 91 6.2KB/s 00:00
intel.sh 100% 637 46.4KB/s 00:00
time_call.sh 100% 74 6.7KB/s 00:00
```
--->
:::
:::info
:::spoiler <b>Step 3. WinSCP 檔案傳輸</b>
<!--- insert from "WinSCP" --->
{%hackmd @TWCC-III-manual/HJCulu6su %}
:::
---
### 3. FileZilla - <b>圖形介面</b>操作 (適用於 Windows / Linux / MacOS / BSD 系統)
基於資安考量,目前台灣杉三號的資料傳輸節點僅提供 <b>SSH 金鑰認證</b>方式登入。FileZilla 支援 ppk 與 pem 等金鑰格式,<b>ppk</b> 格式可透過執行 <b>puttygen</b> 取得。
**- 使用 FileZilla 前請先確認已上傳 public key 至 server 端。產生與匯入金鑰步驟與 WinSCP 的 Step 1. 與 Step 2. 相同**
:::info
:::spoiler <b>Step 1. 產生公私鑰對 - PuTTYGEN</b>
<!--- insert from "PuTTYGEN" --->
{%hackmd @TWCC-III-manual/rJPb6xJhu %}
:::
:::info
:::spoiler <b>Step 2. 將 public key 存入 Taiwna3 主機端</b>
#### - 手動加到 `~/.ssh/authorized_keys`
<!--- "使用 puttygen 產生的 Key 不會在這個路徑生成"
#### 1. 在產生key pair之後查看 public key 內容並複製
- 請開啟 <b>Terminal</b> 輸入 `cat /Users/用戶帳號/.ssh/id_rsa.pub`,即可取得 `id_rsa.pub` 完整資訊。
```!
local_user@local_host ~% cat /Users/local_user/.ssh/id_rsa.pub
ssh-rsa AAAAB3NzaC1yc2EAAAADAQABAAABgQDLcQ7uVYhDDu2Rf8kTFIiZdXhDcAs+DdGJoKAAE2Bra6OVOkOD1qYF5TYH/Rr1I9EwpHPrPVLRvlgY4o4STw46uxj1XhO15ZY8Nlo4gWVHwyWnlCNAM7JF95xcQUbxCNB3EFdI8S0rFw9R8fgREzG1PG3rDyMHX0SdggZf5hnnqR0UCxViRwgPIHaM2LVx9HqBriD2ZqcjR19lFcGN3htNjChtmBdek0300kI364uAtaaadJLrX4gA4K2WftSwwm00A/UFksuS70Om+dt4KVtfixFgfb38OM5kG/7OJC5OsjxCaO6vHNk68bWC1ItTnPKshdoSARByig5txaGe1bnFD3Xlj2v0K0jY5BBzOODHJXjsmbMCL5WN+70+q8DCpGkQ0Zjsyn5BBrR/1QsPtQsyX7VB#####&&&&&*****%%%%^^^^^= xxx@HYdeMacBook-Air.local
```
--->
#### 1. 連線到台灣杉三號的登入節點
- 可開啟 <b>Terminal</b> 輸入 `ssh $user_account@twnia3.nchc.org.tw`,依提示輸入主機密碼與OTP (<font color="#FF0000"><b>$user_account 為使用者帳號,請依實際帳號名稱輸入,勿照抄!</b></font>)或使用putty等其他ssh client登入系統。
<!---
```!
xxx@HYdeMacBook-Air .ssh % ssh xxx@twnia3.nchc.org.tw
Password:
Changing MOTP: 759450
Auth MOTP: PASS
Auth Password: PASS
Last login: Fri Jun 18 20:59:50 2021 from
.....
```
--->
#### 2. 編輯 `~/.ssh/authorized_keys`,將 public key 內容貼上後存檔
- 輸入 `cd .ssh/` 進入目錄後再輸入 `vim authorized_keys`
- 按 `i` 進入編輯模式開始編輯,將複製下來的 public key 內容貼上
```!
[xxx@lgn301 ~]$ cd .ssh/
[xxx@lgn301 .ssh]$ ls
authorized_keys id_dsa id_dsa.pub id_ed25519 id_ed25519.pub known_hosts
[xxxlgn301 .ssh]$ vim authorized_keys
```
- 結束編輯時,按 `esc` 跳到命令模式,鍵入 `:wq` 接著按 `enter` 完成存檔。
#### 3. 檢查檔案屬性
- `authorized_keys` 檔案屬性應該只允許 owner 可以 `rw`,請輸入 `ls -l ~/.ssh/authorized_keys`
```!
[xxx@lgn301 .ssh]$ ls -l ~/.ssh/authorized_keys
-rw------- 1 xxx TRI1101195 1164 6月 20 15:24 /home/xxx/.ssh/authorized_keys
```
- 若與上述不符合,請檢查上一層的 `~/.ssh`,也應該只有owner可以 `rwx`。請輸入 `ls -ld ~/.ssh`
```
[xxx@lgn301 .ssh]$ ls -ld ~/.ssh
drwx------ 2 xxx TRI1101195 4096 6月 20 15:24 /home/xxx/.ssh
```
- 若不確定屬性是否正確,請輸入 `chmod 700 ~/.ssh` 和 `chmod 600 ~/.ssh/authorized_keys`
```!
[xxx@lgn301 .ssh]$ chmod 700 ~/.ssh
[xxx@lgn301 .ssh]$ chmod 600 ~/.ssh/authorized_keys
```
<!---
#### 4. 回到本地端測試是否可以 sftp / scp 到資料傳輸節點
- 將 public key 存入 Taiwna3 主機端後,可在本地端輸入 `scp` 指令進行測試。本例將所有.sh檔案 `./*.sh` 上傳至`@t3-x1.nchc.org.tw`
- 輸入 `passphrase` 後若自動完成上傳,表示 public key 已成功存入主機端
```!
xxx@HYdeMacBook-Air % scp ./*.sh xxx@t3-x1.nchc.org.tw:~
Enter passphrase for key '/Users/xxx/.ssh/id_rsa':
hi_name.sh 100% 91 6.2KB/s 00:00
intel.sh 100% 637 46.4KB/s 00:00
time_call.sh 100% 74 6.7KB/s 00:00
```
--->
:::
:::info
:::spoiler <b>Step 3. 執行FileZilla</b>
<br>
- 開啟站台管理員,點選 「**新增站台(N)**」
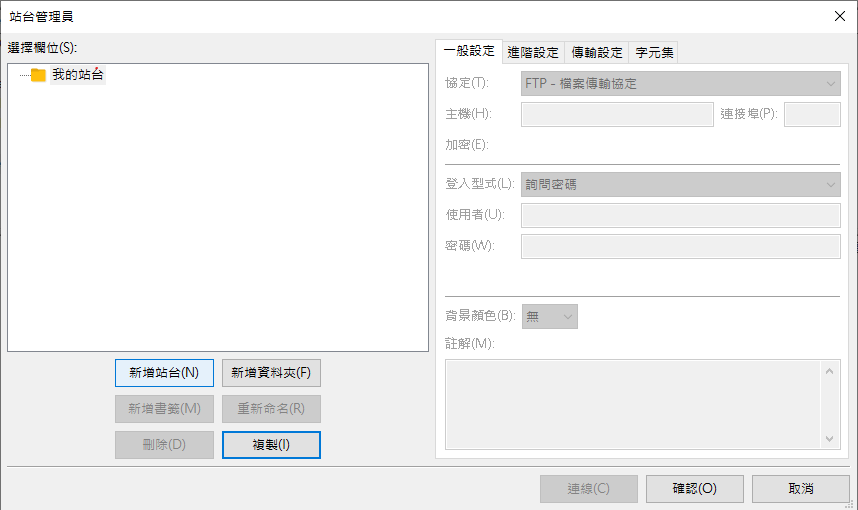
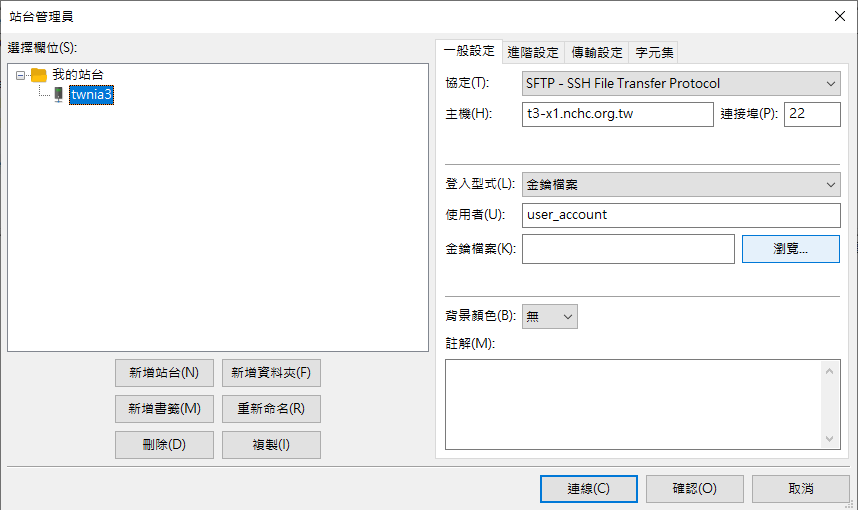
站台名稱可自行命名,依序填寫各欄位資訊:
(1) <b>協定(T)</b>: SFTP
(2) <b>主機(H)</b>: t3-x1.nchc.org.tw 或 t3-x2.nchc.org.tw
(3) <b>連接埠(P)</b>: 22
(4) <b>登入型式(L)</b>: 金鑰檔案
(5) <b>使用者名稱(U)</b>: 使用者帳號名稱
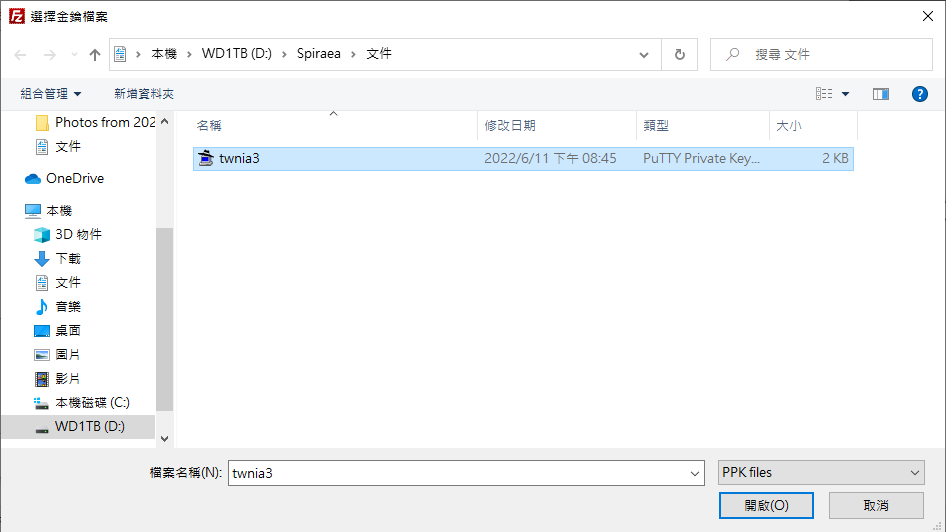
然後按下<b>「瀏覽...」</b>,找到 Step1.儲存的私密金鑰(Private Key)
按下<b>「開啟」</b>將私密金鑰載入 FileZilla
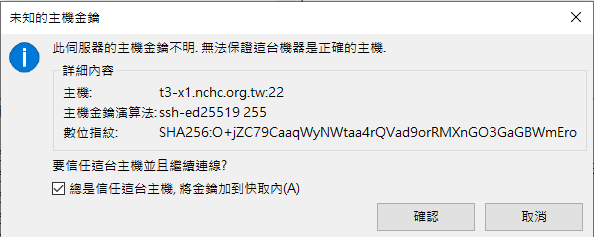
按下<b>「連線」</b>,第一次連線會出現以下視窗,請點選 <b>"總是信任這台主機..."</b>,按<b>「確認」</b>
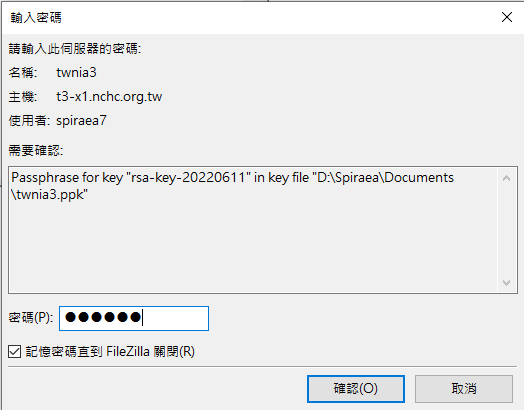
若您的私密金鑰有密碼保護,會出現要求您輸入密碼的視窗,輸入金鑰密碼即可;若無密碼保護,則會直接進入登入視窗
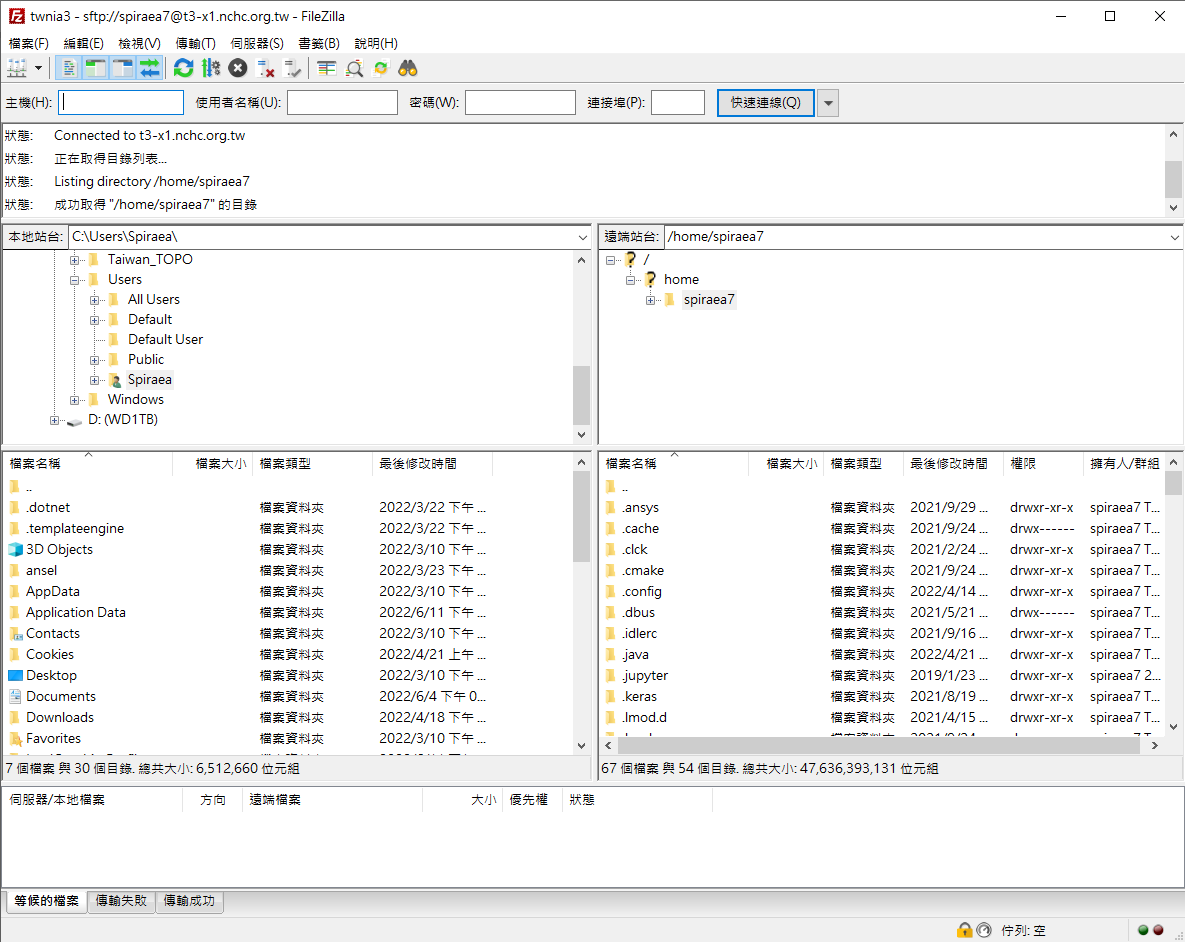
成功登入畫面
:::